Planting Density and Design
Density and Yield
The standard orchard density is a 20 × 20-foot tree spacing (6 × 6 meters).
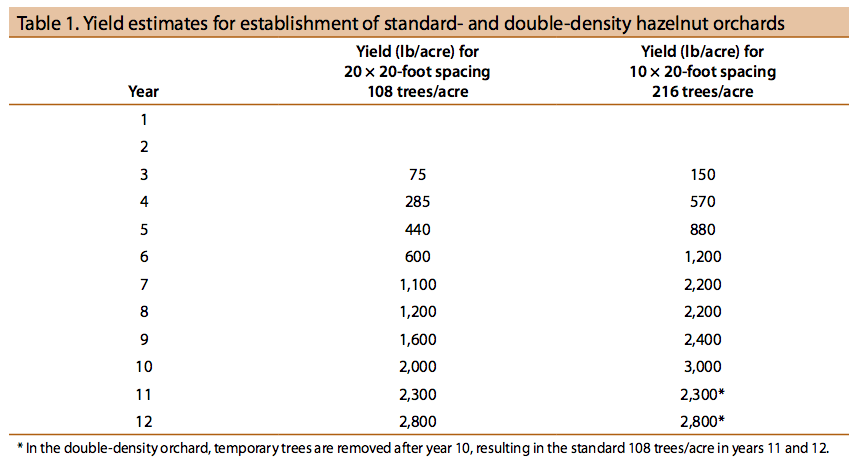
One way to get profitable returns from a hazelnut orchard much earlier than usual, while avoiding the usual drawbacks of intercropping (planting another crop between the tree rows), is to plant a high-density orchard. Because the yield per tree from a high-density orchard is nearly the same as that from a standard-density orchard for the first 5 or 6 years, yield per acre goes up in proportion to the increased number of trees. Thus, in a double-density orchard, per-acre early yield is double that of a standard orchard.
Rectangular spacing of 10 × 20 feet with 218 trees per acre or 12 × 18 feet with 201 trees per acre allows for thinning to a triangle of approximately 20, 21, or 22 feet, which makes cross-flailing (flailing in two directions) easy. (Metric spacing is 3 × 6 meters with 538 trees per hectare or 3.6 × 5.5 meters with 496 trees per hectare, with thinning to a triangle of about 6, 6.4, or 6.7 meters.) An herbicide-treated strip of soil down the rows reduces the need for cross-flailing, but cross-flailing helps eliminate grooves in the soil surface, which makes harvest easier.
Table 1 shows theoretical yields from 10 × 20-foot spacing versus a standard 20 × 20-foot planting. When the trees become crowded, some growers prune back the temporary trees to allow the permanent trees to grow out in a fairly normal pattern. The temporary trees are removed after year 10.
Spacing and Arrangement of Permanent Trees
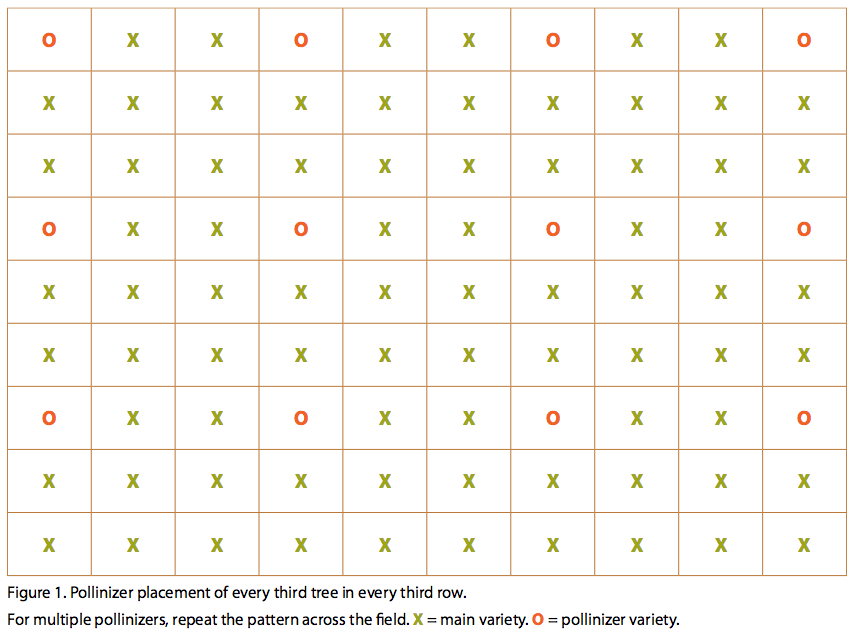
The standard 20 × 20-foot square (6 × 6 meters) with 108 trees per acre (267 trees per hectare) is adaptable to a variety of soils and situations. The advantage of this slightly wider permanent spacing is that it provides a good, productive environment that has plenty of sunlight. A disadvantage, compared with closer spacing, is lower early yield. Figure 1 shows an orchard layout with 10% pollinizers placed every third tree in every third row.
For well-managed orchards with good soils, an 18 × 18-foot square (5.5 × 5.5 meters) with 134 trees per acre (331 trees per hectare) is a good permanent spacing for some soils and varieties. It accommodates standard-size equipment and makes it possible to work the orchard in three directions. This helps avoid grooves in the soil surface, which may form when the orchard always is worked in a single direction. The main disadvantage is that it is difficult to interplant other crops between the rows because of the reduced alley width between trees.
A 10 × 18-foot rectangle (3 × 5.5 meters) with 242 trees per acre (598 trees per hectare) can be thinned to form a 20 × 20.6-foot triangle (6 × 6.3 meters) by removing every other tree. The main advantage of this arrangement is early yield. Disadvantages include the inability to cross-flail, higher costs to purchase and maintain additional trees, and the cost of tree removal at thinning time. Use this arrangement only if you are willing to provide intensive management.
Head Lands and Loading Zones
It is important to leave enough room at the edges of the orchard to comfortably turn a tractor and sprayer or harvester. You need to leave enough room to turn into the next row without stopping and backing up. Also leave some open area where you can stack tote bins during harvest. Placing the loading area near a road will reduce the time needed to fill a truck for delivery to the receiving station.
Establishing a New Orchard
Using a Global Positioning System (GPS)
Modern GPS systems allow precision planting of orchards. There are companies that will contract with you to mark the exact spot for each tree according to your planned spacing and tree arrangement.
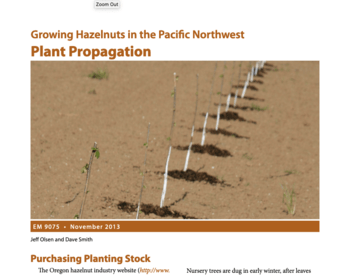
Planting Trees
Plant trees anytime from fall through spring, as soon as possible after you receive them from the nursery. Don’t let the tree roots dry out before planting. The earlier a tree is planted, the more time it has to develop a working root system before it leafs out in the spring. Root growth is active in January and February whenever soil temperatures are 40°F (4.5°C) or higher.
Before planting, prune off the ends of broken roots. On trees propagated from stool beds or layers, remove any of the original layered wood remaining below the main area of rooting.
Dig holes for the trees 18–24 inches (45.7–61 cm) wide and 10–12 inches (25.4–30.5 cm) deep. Partially fill the hole with a small mound of soil. Digging in wet ground with a power auger might cause compaction on the sides of the holes. If this happens, loosen the compacted area.
Spread the tree roots out, and press them down into the bottom of the hole on top of the small mound of soil. Add enough soil so the top root is 2–3 inches (5.1–7.6 cm) below the soil surface. Then add a few extra inches to allow for settling of the soil. If you are planting a grafted tree, do not bury the graft union. Tamp the soil firmly on top of the roots to exclude air pockets.
It is never too early to start leveling the soil throughout the orchard to make flailing and harvesting operations easier.
Pruning at Time of Planting
During planting, considerable portions of the roots are lost, and the tree’s water-absorbing capacity is reduced. If trees are not cut back, their root systems might not be able to provide sufficient moisture to replace moisture lost by transpiration. Consequently, tree growth might slow, or the tree might die.
After you plant the trees, prune back the tops, leaving a trunk 30–36 inches (76–91.4 cm) tall. If trees are branched, cut the laterals (side branches) back to a few buds, or remove all laterals. This top reduction should offset root damage that occurred during digging and handling. After pruning each tree, sterilize pruning tools with 70% ethyl alcohol to prevent the spread of bacterial blight.
Protecting Against Sunscald
In the first few seasons after planting, the trunks of young hazelnut trees are susceptible to sunscald, especially near the surface of the soil or mulch. Painting the trunks once per season for the first 2 years with a 50%–70% solution of white, water-based, exterior latex paint will provide ample sun protection. To make a 70% solution, mix seven parts paint with three parts water. Don’t use lead-based paints.
Paint the trunk so the reflective white surface is below the soil level. Mulch often settles, leaving an unpainted section of the bark near the soil line, and this section is more susceptible to sunscald. You can also tie tree protectors loosely around the trunks to protect against sunscald and chemical contact.
Irrigating and Mulching
It is best to water young trees in the summer for the first 2 years. Use sawdust or compost mulch about 3–4 inches (7.6–10.2 cm) deep around young trees to suppress weed growth and preserve soil moisture. Mulches with high organic matter can reduce the effectiveness of certain herbicides; therefore, apply soil-residual herbicides before mulching.
For More Information
Many Oregon State University Extension publications on hazelnut production are available through the OSU Extension Catalog:
This information is provided for educational purposes only. If you need legal [or tax] advice, please consult a qualified legal [or tax] adviser.
Trade-name products and services are mentioned as illustrations only. This does not mean that the Oregon State University Extension Service either endorses these products and services or intends to discriminate against products and services not mentioned.
Use pesticides safely!
- Wear protective clothing and safety devices as recommended on the label. Bathe or shower after each use.
- Read the pesticide label—even if you’ve used the pesticide before. Follow closely the instructions on the label (and any other directions you have).
- Be cautious when you apply pesticides. Know your legal responsibility as a pesticide applicator. You may be liable for injury or damage resulting from pesticide use.
© 2018 Oregon State University.
Extension work is a cooperative program of Oregon State University, the U.S. Department of Agriculture, and Oregon counties. Oregon State University Extension Service offers educational programs, activities, and materials without discrimination on the basis of race, color, national origin, religion, sex, gender identity (including gender expression), sexual orientation, disability, age, marital status, familial/parental status, income derived from a public assistance program, political beliefs, genetic information, veteran’s status, reprisal or retaliation for prior civil rights activity. (Not all prohibited bases apply to all programs.) Oregon State University Extension Service is an AA/EOE/Veterans/Disabled.