Purchasing Planting Stock
The Oregon hazelnut industry website (http://www.oregonhazelnuts.org/) lists licensed hazelnut nurseries.
The best quality tree gives the best performance. Although hazelnut trees often are sold by height, tree caliper (diameter) and quantity of roots are more reliable indicators of the stored food reserve of a nursery tree.
Conventionally propagated bare-root hazelnut trees should be at least 0.5 inch (1.3 cm) in diameter at 6 inches (15.2 cm) above the soil line. Trees produced in pots from micropropagated cuttings will often be smaller, both in stem diameter and height, but should have a well-developed root ball to ensure good performance in the field.
Nursery trees are dug in early winter, after leaves have fallen and the plant tissue has hardened. The roots of dug trees are heeled (temporarily buried) in moist sawdust or soil so they will not dry out or freeze.
Order and plant trees as soon as they are available for best results. Plant container-grown plants as early in the fall as possible. This allows for the greatest root development before budbreak in spring and helps avoid freezing damage to the root system. Unplanted, unprotected potted trees can be seriously damaged if temperatures drop below freezing. The further below 32°F (0°C), the longer the roots stay frozen; the lower the relative humidity during the freeze, the greater the root damage and potential for tree death.
Propagating Planting Stock
Most growers purchase nursery stock. This section includes basic information for growers who wish to propagate their own trees and provides context for growers who want to purchase planting stock.
Remember that most new varieties from the Oregon State University breeding program are protected by plant patents. You may propagate these varieties only if you have a license to do so. This includes trees propagated for sale to others or for your own commercial orchard. Contact the Oregon State University Office for Commercialization and Corporate Development (OCCD) at 541-737-8303 or [email protected] for details.
Traditionally, hazelnuts have been propagated by simple layering. Now it is more common to use tie-off layering, grafting, softwood cuttings, and microcuttings from micropropagation. Each propagation method has advantages and disadvantages, for both the propagator and the orchardist. If you propagate your own trees, choose a method that best fits the level of management you are most comfortable with:
• Simple layering requires little more than the mother plant, proper timing, a shovel, and good plant husbandry.
• Tie-off layering requires more tools, sawdust, and more steps to ensure the health of the mother plant.
• Grafting requires growing rootstocks, collecting and storing scion wood, skill at the grafting operation itself, a hot-callusing apparatus, and care after the grafted trees are growing in the nursery.
• Cuttings, either softwood or from micropropagation, require a greenhouse or controlled environment room where you can carefully mange heat, light, and humidity as the cuttings root and transition to growing in a container. Growing cuttings requires the most skill, as container-grown plants must be watered (not too much, not too little), fertilized, pruned, sorted, staked, and protected from freezing.
• All propagation methods require pest and weed control.
Simple Layering
Description
Simple layering involves rooting a plant part that still is attached to the parent plant. Year-old shoots on a stool (stump from which stems are produced) are bent into an S-shape, so that one bend is underground, where roots can form on it. The tip end of the sucker or stem is left above ground to continue growing to form the new tree.
Process
1. Begin the layering procedure about the time the tree begins leafing out. If shoots break when you bend them to the ground, it is too early.
2. Loosely cultivate the soil around the stool and then select a stem from the previous season’s growth. Strip the leaves from all but the apical (top) 12–18 inches (30.5–45.7 cm) of the stem.
3. Open a slot in the soil with a shovel to the full depth of the shovel blade.
4. Bend the stem and twist it slightly to the side as you set it in the slot. Hold the stem in place by firmly stepping in the soil on top of the buried section.
5. Roots form on the underground portion of the stem during the summer, and new shoots grow from the mother plant for layering the next year.
6. In late autumn or early winter, after leaf fall, cut the layered stem from the stool and dig it up. At this time, prune broken roots and grade the tree according to trunk diameter and straightness.
Considerations
Some growers have successfully increased rooting by applying a rooting hormone (indolebutyric acid [IBA]), just before burial, to the portion of the shoot that will be underground. Caution: Read and follow label directions for rooting hormones; they are regulated like other agricultural chemicals. The best trees to plant in the orchard are those that lack a crook at their base (called a “J root”) and whose roots originate in a short space (2–4 inches, or 5.1–10.2 cm) along the stem. Trees produce fewer suckers in the orchard if their roots originate in a short space.
Tie-Off Layering
Description
Many hazelnut nurseries now use the tie-off (hog ring) method for propagating trees from sucker shoots on either a mother plant in the nursery or a young orchard tree (Figure 1). Unlike simple layering, tie-off layering uses the current season’s shoots. A staple is used to girdle the shoot (sucker), which helps induce the formation of roots on the stem above the staple.
Process
1. When the majority of new suckers are nearing pencil diameter or slightly smaller (mid-June), apply a hog ring-style metal staple near the base of the shoot by using a special pliers (e.g., the Stanley Bostitch P7 hog ring pliers).
2. Apply a rooting hormone containing IBA at a concentration of 500–1,000 ppm to the lower 6 inches of the shoot to further stimulate rooting.
3. Mound moist sawdust around the base of the shoots to a depth of at least 8 inches. The sawdust provides a moist environment for the new roots and physical support for the shoots. Other rooting media, including aged horse stall scrapings and composted municipal yard waste, also have been used successfully.
4. Retain the sawdust around the stool by piling it high and wide, or by using boards or a ring of tar paper or sheet metal (8–10 inches tall).
5. Harvest the tied-off suckers after leaf fall has begun (typically in mid-November). Remove suckers from the stool by carefully breaking them loose by hand at the point where they were girdled by the staple.
Considerations
Girdling the stems prevents photosynthates (food produced in the leaves) from getting to the root system of the stool. This can result in a decline in sucker sprouting in subsequent years and rapid loss of vigor of the mother plant. To avoid this problem, either retain a perennial mother shoot or do not apply staples to several of the suckers so they can feed the root system of the stool.
Keep the sawdust moist to prevent the developing roots from dying as a result of desiccation (drying). Freezing weather complicates harvesting, as it is difficult to remove the frozen outer layer of sawdust from the suckers. With either method of layering, extra fertilizer and irrigation will result in bigger plants and stronger mother plants.
Grafting
Description
Grafting involves splicing together a scion (detached shoot) of one tree to a rootstock (trunk and root system) of another tree. The rootstock and scion are cut with a knife in a complementary fashion so the cambial layers of the scion and rootstock match along at least one side of the graft union. The cambium is the single cell layer between the two major parts of a plant’s vascular system (phloem and xylem) and is responsible for producing the callus tissue (wound healing tissue) that “knits” the scion and rootstock together. Because hazelnut bark is so thin, matching the cambium on scion and rootstock is often accomplished by matching the outside surface of their bark.
A successful graft results when the scion and rootstock heal together to form a functioning vascular system that can route water to the scion and support the emerging leaves when budbreak occurs. For this to happen, the temperature around the graft union must be warm enough (above 70°F [21°C]) for reliable callusing to occur. Also, the scion must be deeply dormant or it will begin growing before the graft union heals, causing it to dry out and die. Lastly, the union must be tightly wrapped with a rubber grafting band or tape so it does not lose moisture and fail.
Grafting Methods and Types
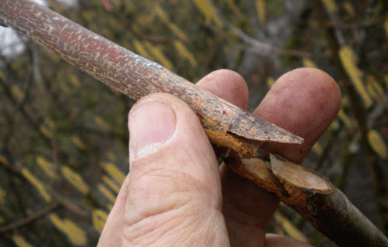
Grafting done using bare root rootstock is known as bench grafting (Figure 2). Grafting on established trees in the nursery or orchard is called field grafting. Several types of grafts have been used with hazelnuts, including the whip and tongue, cleft, saddle, wedge, and side grafts. The choice of graft depends largely on the grafter’s preference. The whip and tongue is the most difficult to master but provides the strongest union before callusing and the most contact area for the scion and rootstock cambiums (Figure 3).
The graft most commonly used by hazelnut nurseries is the V-graft, which is done using the Fieldcraft Topgrafter tool (Raggett Industries, Ltd., New Zealand). The Topgrafter is easy to use, especially for bench grafting, and nurseries report success rates in excess of 90%. There is one drawback to this type of graft: If the rootstock and scion are different diameters, extra care must be taken to maintain cambial alignment along one edge while the union is being wrapped because the rootstock and scion are not interlocked and can shift from side to side, losing cambial contact. Some nursery operators staple the graft union together to provide additional support while grafts are being wrapped. Having a rootstock and scion of the same diameter is the best way to ensure proper cambial alignment. A two-bud scion is the standard length, and diameters can range from 3/16–½ inch.
Bud grafting, either T-budding or chip budding, has not been successful for hazelnut propagation and is not practiced commercially in Oregon.
Considerations for Bench Grafting
Hazelnut grafting success depends greatly on the temperature the graft union is exposed to. Therefore, bench grafting during the winter must be done using a hot-callusing system that provides heat to just the graft union, but not to the scion buds or the rootstock below the union. Heating the graft union will stimulate callusing while the scion buds and rootstock are exposed to the ambient winter temperature and, therefore, remain dormant.
This heat can be provided by electric heating cables or warm water piped through an enclosure that retains the heat around the graft union. Many different systems will work, as long as they can provide heat to promote callusing without inducing budbreak in the scion or rootstock.
Callusing takes place in 2–4 weeks. Grafted trees are often held under cover for a period of time after removal from the hot-callusing system so the graft union regains some degree of cold hardiness before being planted into the nursery row.
Bench grafting is most often done in the winter, from mid-December through February. Scion wood is usually collected as needed, preferably from straight, disease-free shoots of first-year wood. Second-year wood works well, too. If scions need to be stored for later use, collect them when they are most deeply dormant (mid- to late December), place them in a polyethylene bag, and close the bag tightly with a twist tie. It is not necessary to treat the ends of the scions with paint or wax or to put moist toweling in the bag. It is most important to store the bagged scions at a temperature that will keep them dormant for the timeframe required. Storage in a normal refrigerator at 40°F (4.4°C) is adequate for a month or two, but longer storage requires a temperature of 28°F–34°F (-2°C–1°C).
Considerations for Field Grafting
Field grafting of hazelnuts has been done for many years, mostly by growers who want to add pollinizer branches onto existing orchard trees. Results have been highly variable, and field grafting is rarely thought of as an easy success. However, trial and error has demonstrated that paying attention to certain factors can increase the potential for success.
Delay field grafting until daytime temperatures are near or above 70°F (21°C). Wait until the rootstock tree has leafed out so the sap has someplace to go when the tip of the shoot is cut off during grafting. If there are no open leaves below the graft union making use of the sap being pushed up the shoot by root pressure, the graft union can become awash in plant sap, which will inhibit callus formation and reduce graft take. These conditions may occur in mid-April some years and not until mid-May in other years.
Waiting too late into early summer is also risky because hot, sunny days can be very stressful to recently grafted scions. The vascular system across the graft union needs some time to become fully functional. If the successful young graft cannot pass enough water to the rapidly transpiring leaves, the scion can wilt and eventually die.
The ideal scenario for successful field grafting is moderately warm daytime temperatures for several weeks following grafting, a rootstock tree with open leaves, and deeply dormant scion wood. For best results, collect scions for field grafting in mid-December, store them at about 32°F (0°C), and graft in mid-April through mid-May.
As more growers and researchers try field grafting, the ideal circumstances for reliable success will become better defined. The greatest benefit of field grafting may be the ability to work new varieties into an existing orchard and add additional or different pollinizers to an established planting. It is difficult to change or add pollinizers to an older hazelnut orchard by removal and replanting because the replanted trees cannot compete with the older, bigger trees for water, nutrition, and sunlight. Topworking the limbs or suckers on an equal-aged root system can give the new pollinizer a much better opportunity to compete with the surrounding trees and grow vigorously. In other tree fruit industries, it is well accepted that an established tree topworked to a different variety can return to good productivity quicker than new, replanted trees and without the cost of removing the old orchard.
Cuttings
Description
Cutting propagation is used with many woody food crops because it makes very efficient use of available stock plants. Cuttings may be used to produce plants for the field, as with blueberries or caneberries, or to produce clonal rootstocks upon which an apple or cherry variety can be budded or grafted. Cuttings were not used for hazelnut propagation before the advent of micropropagation. Now, nurseries produce a large proportion of the trees of new hazelnut varieties released from the Oregon State University breeding program by using microcuttings, which are cuttings derived from plants propagated in aseptic, in vitro culture. This also has renewed interest in conventional cuttings, as nurseries set up to do microcuttings can use the same facilities for rooting conventional softwood and hardwood cuttings.
Cutting propagation requires a greenhouse with a mist or fog system to control humidity, or a controlled environment room, in which light is provided from lamps rather than sunlight. These additional facilities and the expertise to manage them keep cutting propagation mostly in the hands of nurseries.
Types of Cuttings
Cuttings are small, detached shoots that are treated with a rooting hormone to induce root formation at the base of the stem.
Microcuttings may be only ½–1 inch and arrive from the micropropagator in a sterile container with an agar growth medium. They are usually unrooted but may be ordered as in vitro-rooted cuttings. Microcuttings can be rooted year round, although the preference is to receive plantlets during spring and very early summer.
Softwood cuttings are current-season shoots. The nursery grower removes them from greenhouse-grown or field-grown stock plants just before sticking them into propagation flats or cell trays. Stock plants for softwood cuttings may be established orchard trees or greenhouse plants held from a previous year because they were not field-ready size. Softwood cuttings are rooted during the summer, when plants are actively growing.
Hardwood cuttings are shoot sections harvested from dormant stock plants. The shoot is fully woody, unlike softwood cuttings, which are not fully lignified. Hardwood cuttings are rooted during the dormant season.
Considerations for Microcuttings and Softwood Cuttings
Microcuttings and softwood cuttings require similar conditions. The environment must limit transpirational water loss until functional roots form and provide water uptake from the propagation medium. In most instances, this is a bench or house within a greenhouse that has a mist system to provide just enough water to prevent excessive water loss but not so much water as to promote foliar disease development or rotting of the shoot base.
Provide bottom heat to keep the rooting environment at 75°F–80°F (24°C–27°C). Treat the bottom ½ inch of the cuttings with a rooting hormone containing IBA (concentration can vary, but 500–1,000 ppm is typical). Rooting can begin in 1–2 weeks.
Transplant rooted plants when they form enough roots to support the plantlets’ water and nutrient uptake needs outside of the mist environment. This might be at the end of 3 weeks or 8 weeks, depending on the environment and the variety being propagated. Then wean the rooted cuttings from the mist environment so they have leaves that are adapted to general greenhouse conditions. Attention to detail and gradual change in the growing conditions are crucial. Hazelnuts do not tolerate sudden shifts in humidity and light intensity, and will stop growing if they encounter too much change. Eventually, you will grow the new plants in the greenhouse with appropriate watering, fertilization, and pest control.
Softwood cuttings taken earlier than mid-July, which was previously recommended, seem to have fewer problems with bud abortion. Determining the ideal time requires trial and error, but current research and experience have shown that cuttings taken in April and May from side branches of greenhouse stock plants and in May and June from suckers and water sprouts of orchard trees root well and retain buds. The interactions between stock plant source, variety genetics, hormone concentrations, timing, and rooting environment have not been researched enough to make definitive recommendations, but results have been good enough to encourage several nurseries to continue testing this method.
Considerations for Hardwood Cuttings
In other tree crops, hardwood cuttings are usually taken from vigorous, dormant, first-year shoots at the onset of winter (late October through November). Researchers in many parts of the world have reported poor success in rooting hazelnut hardwood cuttings. However, some success has been achieved by using very small, late-season suckers that grow underground on nursery trees or in the sawdust mound where tie-off layering is being done. These small suckers, or “suckerlets,” are usually only 1/8 inch in diameter and 4–8 inches long. These tissues might root more easily than than conventional dormant cuttings because they are etiolated (have never been exposed to sunlight and the open-air environment), which is known to enhance rooting ability in cuttings of other woody plants.
Collect suckerlets when you harvest tie-off layers or nursery trees. You can store them for a short time in plastic bags in the refrigerator.
Cut suckerlets into 2-inch lengths, but make sure to keep the orientation correct. Know which end is the basal (bottom) end and which is the apical (top) end. Quick-dip the basal ends in 2,000–4,000 ppm IBA rooting solution and then stick the cuttings in a flat or cell tray filled with a porous rooting medium, such as 50% peat moss and 50% perlite.
Place the flats on a heating mat to provide 75°F (24°C) bottom heat. A short misting once every hour during the daytime may be beneficial. Rooting takes longer with hardwood cuttings (6–8 weeks), so be patient. You will know which cuttings have rooted successfully because they will push out shoots and grow. As soon as the roots are developed enough to transplant, put cuttings into a medium-sized container, such as a 2.5 × 5-inch band pot. Grow the new plantlets in the greenhouse to maximize their growth potential.
Summary
Each propagation technique has advantages and disadvantages, most of which are related to the level of management time and skill required. If you are interested in propagating your own planting stock, find a mentor to help you learn about the techniques you are going to use. And remember: There is no better teacher than experience!
For More Information
Many Oregon State University Extension publications on hazelnut production are available through the OSU Extension Catalog:
This information is provided for educational purposes only. If you need legal [or tax] advice, please consult a qualified legal [or tax] adviser.
Trade-name products and services are mentioned as illustrations only. This does not mean that the Oregon State University Extension Service either endorses these products and services or intends to discriminate against products and services not mentioned.
Use pesticides safely!
- Wear protective clothing and safety devices as recommended on the label. Bathe or shower after each use.
- Read the pesticide label—even if you’ve used the pesticide before. Follow closely the instructions on the label (and any other directions you have).
- Be cautious when you apply pesticides. Know your legal responsibility as a pesticide applicator. You may be liable for injury or damage resulting from pesticide use.
© 2018 Oregon State University.
Extension work is a cooperative program of Oregon State University, the U.S. Department of Agriculture, and Oregon counties. Oregon State University Extension Service offers educational programs, activities, and materials without discrimination on the basis of race, color, national origin, religion, sex, gender identity (including gender expression), sexual orientation, disability, age, marital status, familial/parental status, income derived from a public assistance program, political beliefs, genetic information, veteran’s status, reprisal or retaliation for prior civil rights activity. (Not all prohibited bases apply to all programs.) Oregon State University Extension Service is an AA/EOE/Veterans/Disabled.