Meat from deer, antelope, elk, moose and bear is a nutritious choice for family meals. You’ll enjoy eating it when it’s good quality, safely handled and well-prepared. For best flavor, handle game carcasses carefully, butcher and store the meat correctly and prepare it in dishes that bring out its best qualities. This publication will help you achieve the best outcomes for your hunt. For more information on how to butcher, prepare and safely handle your wild game meat, consult Canning Meat, Poultry, and Game (PNW 361) and Making Jerky at Home Safely (PNW 632).

Success begins as you plan your trip into the field
Good planning for your safety and comfort increases your opportunity to enjoy a successful hunt. Here are some reminders to reduce risks and maximize gains from the experience!
- Food safety begins with considering how you will harvest your animal. If you hunt with a rifle, consider using an alternative expanding, nontoxic or nonlead bullet that will retain mass and effectiveness. By choosing nontoxic ammunition, you will likely increase the amount of meat you can use because you will not need to take extra trimming precautions to avoid lead contamination.
- Scouting, planning and communication ensure others know your travel plan and what day and time you expect to return. Have an accurate map of your area and carry a compass, even if you plan to carry your phone and GPS unit. Batteries can die, signals can fail and the experienced outdoors person can lose their way while trailing an animal in changing conditions. Be prepared to know where you are and how to return to camp in all cases.
- Hanging game in a good place with the right equipment is the secret to getting clean meat out of the field, so keep that feature in mind as you choose your campsite.
- Know the regulations for the species you are pursuing and the state in which you are hunting: Which body parts, evidence of sex/age or other requirements need to be preserved?
- Dress for Mother Nature’s moods and challenges.
- Clothing and medications: Are you prepared if you must spend an extra night in the field or if the weather conditions change dramatically? Do you have extra socks, a space blanket, a basic first-aid kit, a mirror or whistle, waterproof matches and any critical medications? If you’re aware of being sensitive to pollen or bee/wasp stings, carry whatever medication you might need. Be sure to know how and how fast those affect you before heading afield.
- Sufficient water: Are you carrying enough water, and do you have enough in reserve? Alternatively, do you have the means to filter the water you find safely? Do you have water (and soap) for washing your hands?
- Be bear-aware: If you hunt in bear country, carry spray, be familiar with drawing and triggering the spray and take precautions to avoid conflicts in your camp.
- Heavy rubber, latex or nitrile gloves are now a standard necessity for field-dressing your wild meat. In the past, the risk of exposure to transferrable diseases and parasites was underestimated, as were their consequences. Do not risk burdening yourself with a life-long health condition, such as brucellosis (also known as undulant, Malta or Mediterranean fever). Keep your meat safe and sanitary by remembering to bring and use soap and water to wash your hands.
Planning to handle your animal once it is down
The quality of your game meat depends largely on how well-prepared and efficient you are in the field once you have your animal down. Here are some of the things you will need for most field conditions:
- 20 feet of quarter-inch nylon rope to drag, hang or position the animal
- Traditional sharp, foldable knife capable of withstanding friction and leverage
- Sharp hunting knife
- Meat saw
- Whetstone or sharpening steel
- 5 feet of string to tag your animal
- Plastic or cloth bags in which to put the heart and liver
- Game bags to cover the carcass of skinned animals
- Homemade sacks of light cotton cloth, 3 feet by 4 feet in size, are suitable for deer and elk. You can use them as ground cover while skinning your animal and as sacks for the quarters or skinned pieces of meat.
- Clean paper or cloth towels to clean up the carcass and yourself
- Black pepper (optional) to coat exposed meat and to deter blowflies
- Tarps, buckets and extra flashlights/headlamps and batteries
If you are employing a gutless method, be sure to bring:
- Replaceable-blade scalpel knife and replacement blades
- Soap and water for hand-washing and bleach to sanitize your blades
- We highly recommend viewing R. Newberg’s “How to field dress elk: The gutless method, hunting field care of meat” on YouTube. The video will help you familiarize yourself with the technique and confidently go into the field.
Before the emergence of chronic wasting disease, we advise using these tools when hunting elk and deer. Read the deer section and think about the terrain where you will be hunting. Moreover, if hunting elk, read the chronic wasting disease-safe gutless method in that section and note which of these tools you may or may not need.
- A game saw to cut the pelvis, brisket and legs
- Block and tackle, especially if you’re hunting elk alone
- Gambrel (frame for hanging the carcass)
First steps in field care of your meat
Hunters kill big game animals in widely varying conditions, so it is impractical to list hard-and-fast rules for field care. However, some basic rules apply in nearly all situations:
- Be sure the animal is dead.
- Cool the meat to less than 40 degrees Fahrenheit as quickly as possible and keep it cold.
- Keep the meat clean. You will notice tips in each of the following sections to achieve this goal, but synthetic game bags are often a good tool to include in your pack.
Bleeding the animal, if necessary
Most big game animals have bled automatically when shot in the chest cavity with an expanding-type bullet or when shot through both lungs or the heart by a broadhead arrow. Any of these options severs the main arteries and veins. Head, neck, spine and “gut” shots, however, may miss major arteries. If in doubt, bleed the animal.
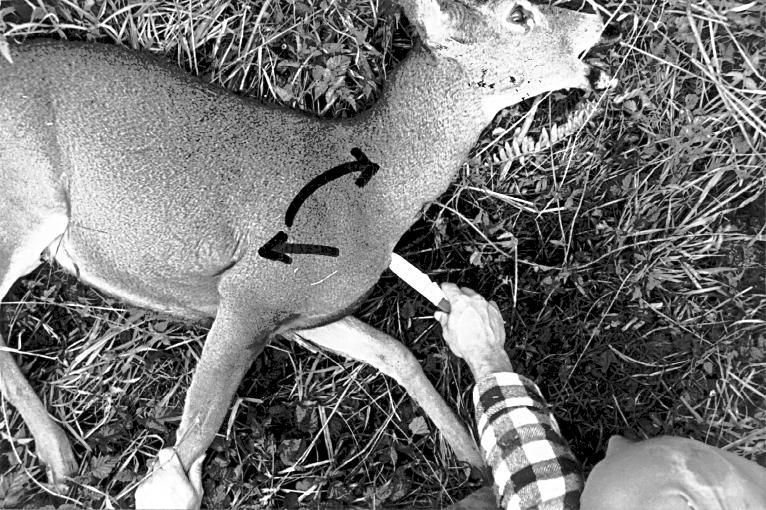
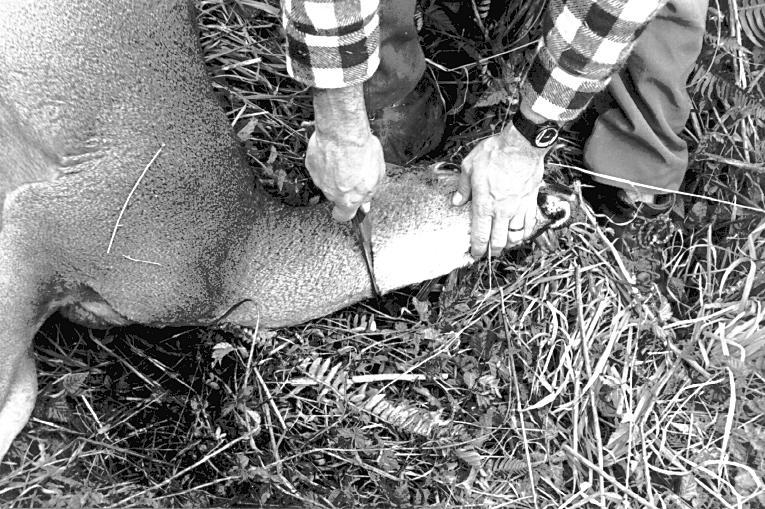
There are two good ways to bleed an animal, depending on whether you want a trophy. If you want a trophy, insert your knife deeply into the soft spot where the neck meets the brisket (chest), aiming the knife's point toward the tail (Figure 1). Twist the knife's point toward the withers (the top of the shoulders) to sever one or both of the common carotid arteries (the main blood vessels leaving the heart). If you are not interested in a trophy, cut the throat below the jaw, severing the arteries and veins (Figure 2).
Cooling the meat
Cool your meat quickly and keep it cold. Your goal is an internal temperature of 40 degrees or lower within 24 hours. Avoid fluctuations in temperature after that. To keep the carcass cold, hang it at night and keep the night chill in the meat during the day. One way to do this is to hang the meat in a shady thicket to protect it from warm sun and air. Another way is to wrap a cold canvas around the meat, lay it on the ground in the shade and place sleeping bags over it to keep the cold air in and the warm air out. To ensure the quality and safety of the meat when the weather is warm, take the carcass to a meat cooler on the day of the kill or as soon as possible.
Deer
Eviscerate your deer immediately. This starts the cooling process and makes the animal lighter and easier to handle. The following procedures apply to a deer that you can transport back to camp intact (leaving the skin on to keep the meat clean) and finish skinning and dressing in camp, at home or the cold storage locker.
Favorable terrain
Here are the steps for eviscerating and skinning your deer on favorable terrain:
- Use a rock or limb to prop the animal on its back with the head slightly downhill. This reduces the pressure of viscera against the stomach wall and makes it easier to cut the skin and muscle without puncturing the rumen or intestine.
- Cut the hide from the groin to the beginning of the ribs (solar plexus). To prevent hair from dulling your knife and getting onto the meat, cut from the flesh side out; slide the knife carefully under the skin at the first cut and cut up and forward, toward the front of the deer. Note: Be aware of your state’s regulations about preserving evidence of the animal’s sex. You may need to maintain attachment of the sex organs to one-quarter of the meat or to preserve parts of the skull, possibly including an eye. Know what you need before you begin field-dressing your animal.
- Make an opening into the body cavity by cutting the thin belly muscle without puncturing the intestines or rumen (Figure 3). Make a small incision in front of the groin (Figure 4), insert your hand and cut the opening to the rib cage. Be careful not to puncture the rumen or intestines.
- Roll the viscera out onto the ground (Figure 5). To do this, reach into the body cavity and pull the rumen (stomach) and intestines out. You may use a knife to cut points of attachment but be careful not to puncture the rumen or intestine.
- Once the rumen and intestines are out, reach inside and cut through the diaphragm (Figure 6) to remove the lungs and heart. Reach forward to the base of the neck and cut the esophagus and windpipe loose. Grasp the heart and lungs and roll the mass toward the animal's rear, including the rumen and entrails. As you roll and pull, you will need to cut some points of attachment, the last one being the colon, near the anus. Cut around the anus. Tie the colon shut with a short piece of string before pulling it into the body cavity to avoid fouling the carcass with waste. Keep the pelvic area clean and avoid any chronic wasting disease exposure risk by keeping the pelvic bone intact.
- Cut the heart and liver free from the entrails. Put them in a cloth sack (an old pillowcase works fine and is handy to carry back to camp). If you use a plastic bag, remove the heart and liver from it as soon as possible so they will cool thoroughly.


- Once all the viscera are out, turn the deer over and drain out excess blood. After the blood has drained, the deer is ready to be moved. Sew the cavity with a strong cord to prevent fouling with dirt, leaves and debris if you need to drag over loose soil or roll it downhill.
- When you return to camp, hang the deer from a tree, a cross-pole or a tripod. While hanging and skinning the deer, avoid touching the metatarsal glands. The metatarsal glands, located on the insides of the hind legs just below the hock, are 5–7 inches long and 2– 4 inches wide and are easily recognized by the long, dark hair covering them. Secretions from these glands may give the meat an undesirable flavor and odor. The secretions may be spread by contact with your hands or knife.
- After you have skinned and trimmed the deer and removed the lower legs, cover the carcass with a game bag. Tie the ends of the bag closed to keep flies out.

Difficult terrain
If you kill your deer in a place where it is impractical or impossible to get the whole, unskinned animal back to camp or transportation, you can skin and quarter it in the field using the gutless method described in the elk section.
- Your first concern is keeping the meat clean. Hanging the deer off the ground is the best way to ensure cleanliness. If that is impossible, attach the deer to a bush or rock on a steep hillside.
- Handle the animal in the same way described above in “Favorable terrain.”
Let the carcass dry, cut it into quarters and put the meat in adequate game bags. You can tie the bundled quarters on packboards and carry them out to camp or transportation.
Elk
Eviscerating and dressing elk in the field differs from handling deer. Due to their size, most elk have traditionally been eviscerated, skinned, quartered or deboned on the spot. If you are hunting alone, you should strongly consider using the gutless method and then have a block and tackle for hanging your meat if you will be making many trips to bring it out to your vehicle. If you have help and can reach your elk with a vehicle, you may carry the whole, unskinned carcass to a processing facility, resulting in a higher quality product and greater meat yield after aging. However, this must be done on the day of the kill.
As with deer and other game species, comply with state regulations for the preservation of evidence of your animal’s sex. In some cases, other body parts may also be needed for data collection, such as testing for Chronic Wasting Disease.
Handling elk in the chronic wasting disease era: The gutless method
Randy Newberg’s video demonstrates the “gutless method” of field-dressing an elk. This method is good for near- or backcountry situations and is a chronic wasting disease-safe way of harvesting your game meat. It is compatible with saving the cape for a full-shoulder taxidermy mount. You can use this method on your own but a helper or an anchor point to tie off a rope makes the work more efficient.
Make sure you bring:
- Replaceable-blade scalpel knife and replacement blades.
- Traditional sharp, foldable knife capable of withstanding friction and leverage.
- Game bags: durable and reusable synthetic ones with drawstrings will dry out quickly help cool, glaze or seal the meat.
The end/quarter you start with depends on how the animal is lying on the terrain, but the cuts and procedures all apply. In the following description, we assume you want to salvage the cape.
Depending on the rigor mortis, there may be an opportunity to start with removal of the uppermost hindquarter — before you even begin the topline or “dorsal” cut, which otherwise would be your first move. To assess the degree of rigor mortis, cut the hind leg above the hock such that you can slip your hand through the hole and around that tendon and have a solid handhold for manipulating the hindquarter. This will help you assess the degree of rigor mortis and will help guide your next decision.
Assuming your animal has a high degree of rigor mortis, remove that uppermost hindquarter first. With the help of your handhold above the hock, check that you can lift that hind leg and maneuver it up to your shoulder as you kneel behind the animal. Target the tendon found right where the hip ball fits into its socket: Cutting this tendon will allow you to free the hind leg and peel it off the carcass without exposing the gut or seeing bone. Start by skinning the hindquarter, beginning your cut where you feel the ball of the hip, and proceeding down the front (head end) of the leg to the hock. You should then be able to lift and cut the hide free of the fat and muscle to the point that you can begin to lift and rotate the hind leg up and toward the backbone. If available, have a partner do the lifting as you continue cutting the tendon that holds the hip’s ball and socket joint in place. Once you can free the ball from the socket, you can easily cut the hindquarter free with your scalpel blade knife. Place the skinned hindquarter in one of your clean game bags.
Now use your sharp folding knife to begin the dorsal cut (along the neck and spinal vertebrae) that will run from the back of the skull to a point where the pelvis and hipbone meet. To save the cape, make the first cuts in a “Y” from the base of each antler burr to the rear of the skull where it meets the spine. The leather underlying the bull elk’s mane is extremely thick and tough, so use your stout folding knife here. Remember, do not cut from the hair side because you would cut hairs in half and ruin that part of the cape. Instead, insert your blade under the skin and cut in the direction of the hair’s grain. The skin is thinner and easier to cut once you reach the shoulders, so you can probably go back to using your scalpel blade knife to continue your dorsal cut to where you removed the first hindquarter. One of the most common mistakes taxidermists encounter is a cape cut too short: This mistake prevents your taxidermist from making a shoulder mount. We recommend taking the cape back to the hip.
Next, insert your knife in the “armpit” of the front leg and cut the hide a short distance toward the brisket and then cut the hide down the back of the front leg to the knee. You will be skinning the rest of the upper leg as part of the cape, but you can now remove the lower leg at the knee joint by alternately flexing the joint and cut the ligaments and cartilage until you can sever the lower leg. You can then skin the cape down to that leg, mid-belly, and much of the neck. Your cut in the armpit is now a pocket in the cape through which you can pull the upper front leg.
You are now ready to remove the first front quarter. Soft tissue and ligaments attach the front quarter to the body. This is another point at which a partner or a pulley will be helpful. As you lift the front leg, cut the soft tissues at the brisket and behind the shoulder and continue lifting the leg out up and toward the spine as you cut free the soft tissues. Once free, place the front quarter in a clean game bag.
Now you will remove the backstrap. The backstrap is a prized piece of meat that extends from the pelvis-hip junction back up to the shoulder, lying in a roughly L-shaped channel between the spine (vertical leg of L) and the tops of the ribs (horizontal leg of L). Use your scalpel blade knife to cut the backstrap away free from the spine and then free it from the front intersection with the pelvis. Now find the tops of the ribs with your fingers: Notice that the ribs become short and absent over the gut as you move to the pelvis. Therefore, you should insert your knife on the tops of the ribs at the head-end of your elk, begin freeing the backstrap along there and then go more slowly and carefully as you pass by those short ribs. Avoid poking your knife down and into the gut. That could be a disaster, releasing the gut contents into your remaining meat and fouling you and your gear. Once you have most of the path cut free along the sides and one end, lift the backstrap and cut it free, placing it in a clean game bag of its own.
Removing the tenderloin requires careful work because the stomach and the gut contents are attached to the meat you will be cutting. The tenderloin connects under the spine itself, near the last rib, and it extends back to under the pelvis. The upside of using your scalpel blade here is that it is well-suited to these fine cuts, but the risk is that you must avoid nicking open the gut sack itself. This means you will have to carefully begin cutting the thin connective tissue holding the guts to the tenderloin, alternately using your hands to carefully roll and pull the gut sack away from the tenderloin, breaking down more of that connective tissue. As you are able, start trimming the muscle (tenderloin) away from the underside of the spine. As the tenderloin begins to be freed from the gut and the spine, you can trim the meat away from the pelvis and finish freeing it from the spine.
There is still some valuable meat to be removed! Trim the remaining meat off the animal’s front end, including the neck, the brisket, the rib meat and any meat remaining near where the backstrap was removed.
At this point, flip the animal and repeat the process on the other side. Once all the meat is removed and bagged, you can remove the head without a saw. Before proceeding with that step, you will need to loosen the cape from the back of the neck and to the lower jaw.
Use the antlers to tip the back of the head up, such that the nose and chin are tipped down into the ground. The more you can lean the back of the head forward, the more exposed the key joint will become. Where the skull meets the top vertebrae is the joint at which you will make the removal. You can find that joint with the tip of your knife and will likely need to trim some meat away to expose the rear edge of the skull fully. Use the disposable scalpel blade to cut all the soft tissues supporting the joint through the spinal cord. You can give antlers a strong shove to break the joint free and continue cutting the remaining soft tissues holding the head from the chin to the throat. You may need to cut free the remaining hide and skin holding the head to the carcass.
Antelope and bear
State regulations may require you to retain part or the entire skull of these species to determine sex and to collect other data. Be sure to know what your state requires before you head into the field so that you can comply with regulations and maximize the enjoyment of your hunting experience.
Because the weather is likely to be warm, you must eviscerate antelope immediately to start the cooling process. You can dress an antelope in the field like a deer. Hanging the animal is best, but this is not always possible. You can use a tripod, a pole suspended from a truck or even the side of a pickup rack to support an antelope.
Have game bags or extra canvas handy to help keep the meat clean. Get the meat to a cold storage plant as soon as possible. If you can get your animal to a cooler within a few hours, leaving the skin on will help keep the meat clean; otherwise, skin the animal.
Field dress a bear the same as described earlier for deer or elk. Avoid dragging the bear if you plan to save the hide.
Transporting big game meat
If you transport game meat by automobile, you must ensure cleanliness and preservation at safe, cool temperatures. Although wrapping meat in game bags, pieces of canvas or heavy wrapping paper can ensure cleanliness, wrapping meat in this manner will also hold in heat and increase spoilage.
Before covering meat for transportation, be sure it has cooled thoroughly, below 40 degrees. Avoid covering or otherwise enclosing game meat that has not been thoroughly cooled. Instead, place the meat in a cool location open to air circulation. You can carry a deer on top of your car if you have a ski rack or luggage carrier, but you will need to travel when the air is cool. This may necessitate night traveling and/or packing your meat in ice coolers.
Field care of big game meat
If you must leave skinned animals or parts exposed in the field for a day, protect the meat against animals by cutting cloth into thin strips about a foot long and attaching the strips in six or seven places on the carcass. Let them hang free. The slightest breeze will make the strips flutter, keeping magpies and ravens away for at least a day. After dressing the animal, drag the entrails at least 25 feet from the meat cache. Marauding birds and animals usually concentrate on the entrails and leave the meat alone. Keep flies off skinned carcasses by covering the meat with sacks or game bags. In drier climates, a glaze forms rapidly on a freshly skinned carcass; while the glaze is forming, swish a branch or towel around the carcass to keep the flies off. The neck and the area along the backbone take the longest to dry. If you must leave meat exposed, throw a liberal amount of black pepper on the moist areas. Freshly laid blowfly eggs are not as bad as they look. When you find a cluster of eggs, simply remove it with a knife or cloth. The meat usually is not contaminated and none of it needs to be cut off and thrown away.
Due to differences in the weather between hunting seasons, elk and deer meat may require different treatment in the camp. Rocky Mountain elk are often shot in freezing weather, while deer may be bagged in warm weather early in the season. Ideally, elk meat should not be allowed to freeze while hanging in camp. It might be advantageous to take deer and elk to a cold storage locker to keep the meat cold or keep it from freezing.
Wash the heart and liver in cold water immediately. Tongue and kidneys are also good to eat. Drain until dry and keep cold.
Aging
Aging meat — also called seasoning, ripening or conditioning — is the practice of keeping carcasses or cuts at temperatures of 30–37 degrees for one to 14 days. Hunters seldom agree on the length of time big game should be aged, but most locker plant operators and meat scientists agree that aging time should be minimized and that game shot during warm weather and not chilled rapidly should not be aged at all. In warm weather, there is less toughening and hardening of the muscles from rigor mortis than when temperatures are below freezing. Also, the natural enzymes responsible for tenderizing meat work much faster in warm weather than in cold weather. Therefore, you should cut the carcass of an animal shot in warm weather as soon as the meat is chilled.
There are several other reasons for not aging game:
- You should not age the meat of an animal severely stressed from running long distances or being wounded and trailed several hours before the kill. This is because stress uses up the energy sources that normally are converted to lactic acid in the muscle. Spoilage bacteria grow much faster in the absence of lactic acid. If you age meat from a stressed animal, it may go bad.
- Suppose the animal has extensive gunshot wounds and bacterial contamination from blood (which has the optimum pH for bacteria). In that case, dirt and hair around the wound also may cause rapid souring of the meat.
- There is no need to age a carcass that has been in camp for a week because aging already has occurred, and bacterial growth is underway.
- If you age meat at a locker plant, the law requires that the carcass be skinned, which can result in excess drying.
- Carcasses from animals under 1 year of age are already tender and need not be aged.
- You do not need to age meat that will be ground, cured or made into sausage because these processes tenderize meat. Unaged meat makes much higher quality sausage and ground meat than aged meat.
- You do not need to age meat that will be cooked by braising, pot roasting or stewing because these moist-heat cooking methods tenderize and break down connective tissues.
Seldom will you find ideal conditions for aging game. When you take an animal with minimum stress and minimum tissue damage due to gunshot and when you transport the carcass to a 34-degree cooler on the day of the kill, follow these guidelines for maximum days of aging according to species:
- Three days: antelope
- Seven days: deer, sheep, goat, cow elk, cow moose
- 14 days: bull elk, bull moose
However, if you notice any mold, slime or “off-odors” developing, you should immediately cut and freeze the carcass.
If you age your game at home without controlled temperature and humidity, leave the hide on during aging to protect against drying and dirt. Laws requiring that game be skinned in commercial coolers do not apply to home coolers. Also, remember to age meat in a clean, cool, well-ventilated place free from strong odors (such as gas, oil and paint), which the meat can absorb. Aging periods at home should be shorter than those listed above, particularly if your storage area temperature rises above 34 degrees.
If you cut and wrap your own game, you may want to process the entire carcass, except for the loin and rib, as soon as the carcass is chilled. The loin and rib, which usually furnish steaks and roasts cooked by dry heat, may then be aged longer. Stop aging the meat as soon as you notice any deterioration or odor. Sour meat from excessive aging not only tastes bad but may also make you sick.
Acknowledgments
This publication draws text and images that originally appeared in various editions of PNW 517, Big Game from Hunt to Home (Oregon State University Extension Circular 1434). Authors of the 2010 edition of that publication were Jan R. Busboom, Extension meat specialist, Washington State University; Carolyn A. Raab, Extension foods and nutrition specialist, Oregon State University; and Dana Sanchez, Extension wildlife specialist, Oregon State University.
The original version of Big Game from Hunt to Home (Oregon State University Extension Circular 1434) was written in 1994 by W. Daniel Edge, Oregon State University; Jan R. Busboom, Washington State University; and Carolyn A. Raab, Oregon State University.
The authors thank David Leer, W. Daniel Edge and two PNW peer reviewers for their advice and reviews regarding key changes in this revised edition.
References
Field, R.A. and J.R. Busboom. 1987. Skinning and Boning Big Game. Publication B-884. Laramie, Wyoming: University of Wyoming.
Marchello, M. and J. Garden-Robinson. 2003, reviewed 2017. Wild side of the menu, No. 2: Field to freezer. FN125. North Dakota State University, Fargo, North Dakota.
Newberg, R. 2016. How to field dress elk: The gutless method, hunting field care of meat. YouTube.
Theodore Roosevelt Conservation Partnership. 2019. Janis Putelis demonstrates how to debone a deer in a chronic wasting disease area. YouTube.
About the authors
© 2022 Published and distributed in furtherance of the Acts of Congress of May 8 and June 30, 1914, by the Oregon State University Extension Service, Washington State University Extension, University of Idaho Extension and the U.S. Department of Agriculture cooperating. The three participating Extension services offer educational programs, activities and materials without discrimination on the basis of race, color, national origin, religion, sex, gender identity (including gender expression), sexual orientation, disability, age, marital status, familial/ parental status, income derived from a public assistance program, political beliefs, genetic information, veteran’s status, reprisal or retaliation for prior civil rights activity. (Not all prohibited bases apply to all programs.)