Central Oregon is one of the most beautiful regions in the western United States. It is also one of the fastest-growing areas in the country.
As we continue to see a consistent pattern of drought in the western United States, we need to balance what our home and commercial landscapes can and should look like with a focus on water conservation and water quality. Landscapes add value, beauty, and livability to our homes and communities, and keeping them water-wise is a critical part of being a good steward in our region.
Full list of water-wise plants
New! Sort and filter plant lists by water use, height or attributes in a web-based app.
Introduction
With only 3 to 6 inches of natural precipitation during the growing season (April through October), water use for our landscapes is a very important consideration. Each year, a typical Central Oregon resident uses over 50 percent of his or her total water consumption for outdoor landscape.
Because we all share water resources, each of us has a responsibility to use it wisely.
Whether you are an experienced gardener or a newcomer to the high desert, learning how to successfully garden can be an exciting challenge. Most gardeners value the natural beauty of our native landscapes but want to enhance them with plants that add color and texture. Can you create a more beautiful, high-desert landscape that is water efficient and sustainable? The answer is yes, if you use water-wise gardening practices.
Water-wise gardening (also known as xeriscaping) combines innovative conservation techniques with sound horticultural practices. Not only is it possible to have a colorful and beautiful landscape while conserving water, you can also save time, energy and money.
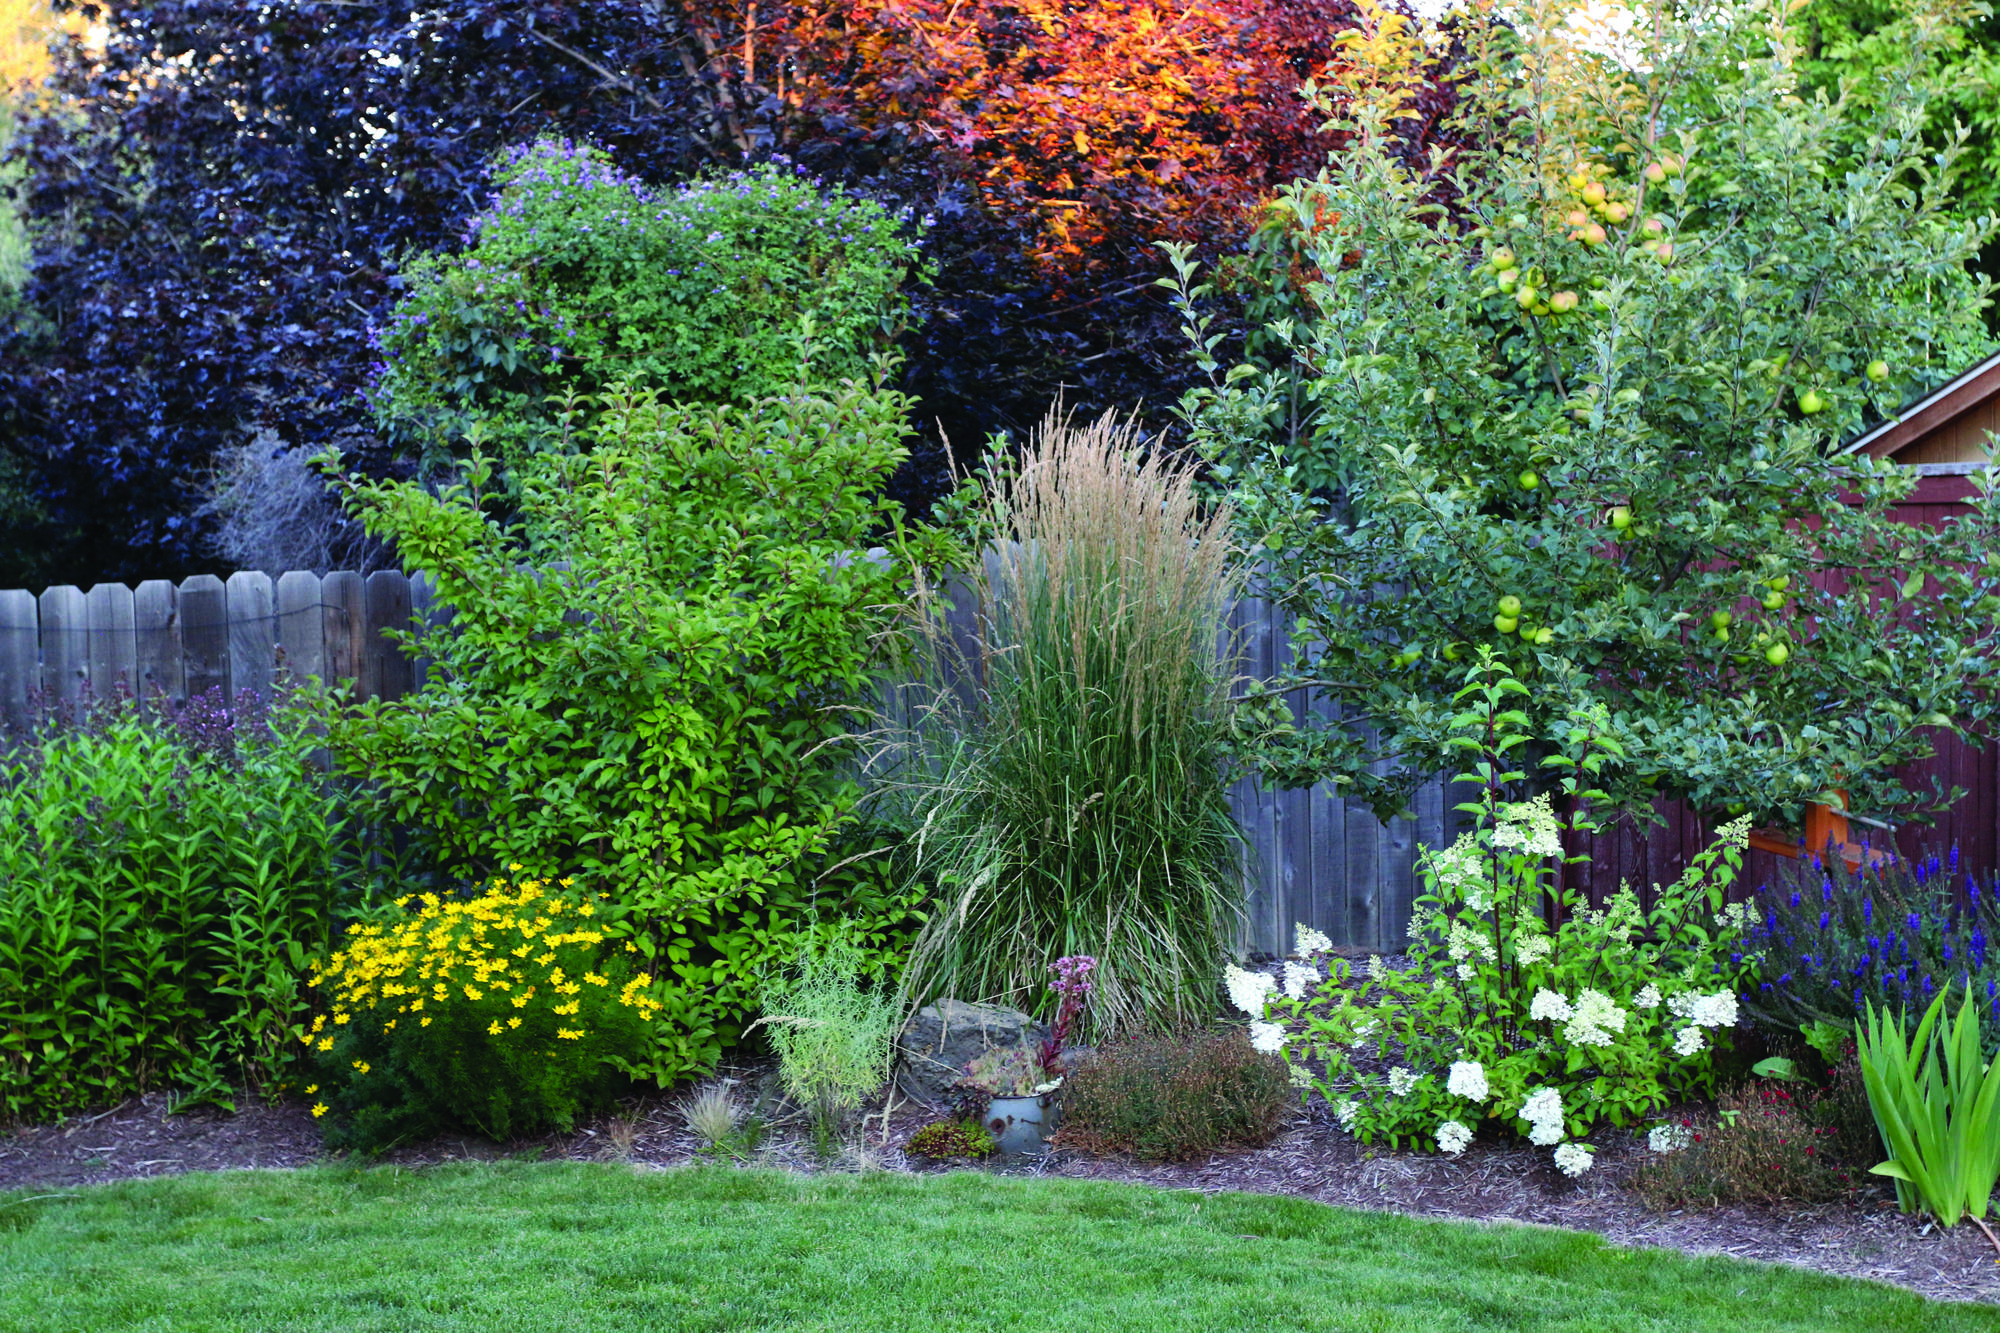
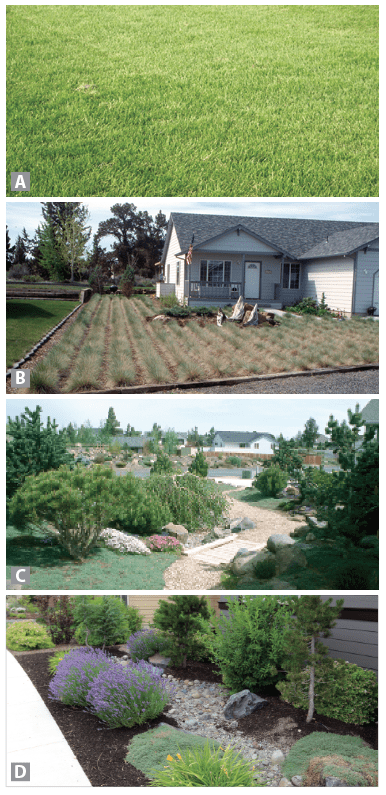
A water-wise landscape may conjure up images of a dry, desert-like “blandscape.” But, in fact, a well-planned, water-wise landscape can be attractive, colorful and rewarding. A water-wise garden does not mean limiting your plant selection to only native plants or plants that use low amounts of water; it can incorporate hundreds of plant choices, including trees, shrubs, evergreens, perennials and grasses (Figure 1).
At the heart of water-wise gardening are efficient irrigation practices and grouping plants together with the same water requirements (also called hydrozoning). Water-wise gardening emphasizes proper plant selection and conserving natural resources. In this guide we describe the steps needed for creating a successful water-wise garden and provide an in-depth look at the plants best suited for high-desert gardening.
Seven steps of water-wise gardening
There are seven steps to water-wise gardening, including garden concepts you likely have heard before. However, the key to a successful water-wise garden is incorporating all seven steps with careful consideration. Eliminating any one of the steps reduces your chance of conserving water and producing a healthy, thriving landscape.
Step 1: Planning and design
Let the fun begin! Careful planning will result in a beautiful landscape for many years. When you start planning, consider your landscape needs and activities. How do you want to use your landscape? How much time do want to spend maintaining your landscape? How does water naturally flow across your site?
You can design the area yourself or enlist the help of a landscape professional. For additional resources, contact your local Extension service, nurseries, library and bookstores, or check out the latest landscape design software. When starting to design, consider things such as: water source availability, slopes, amount of sunlight, soil type, views, microclimates, and pertinent local and state requirements on Oregon Drainage Law (see Central Oregon Stormwater Manual).
Begin by creating a list of ideas you would like to see in your landscape, including hardscaping such as patios, boulders and arbors. If you like the idea of a water feature, consider placing a birdbath or recirculating fountain to add that extra water element without greatly increasing water use.
Water-smart site design, together with efficient irrigation, is the basis of a successful water-wise garden. You will save water, time, and money with a well-planned site layout that takes advantage of using stormwater runoff in combination with a well-planned, supplemental irrigation system.
Stormwater management
With the rain-shadow effect of the Cascade Mountains, Central Oregon receives far less rain than Western Oregon and has less overall annual precipitation. According to Oregon Drainage Laws, water may only come off a developed site in an amount and manner it would under natural conditions. This law encourages landscape design that preserves and uses water to supplement your landscape while reducing your irrigation needs and costs.
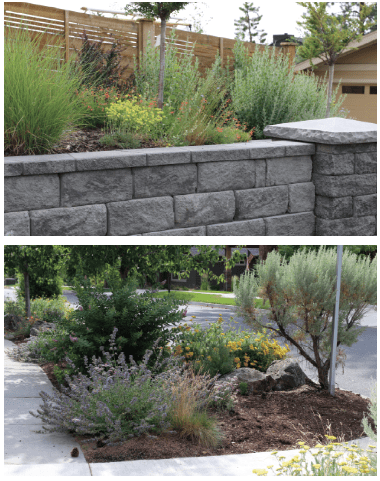
Consider how water runoff moves across your site. Try to work with that natural flow as much as possible, and use it as a design element. Redirect water with berms and dry creek beds (Figure 2). If not well planned, intensive runoff flows, especially when combined with hardscape or impervious surfaces and slopes, can pick up debris and cause erosion that are problematic to a landscape and site features.
Water cannot sink through impervious surfaces such as typical roofs, driveways, or patios; instead it will collect and run off. The greater the water runoff, the more quickly it will travel across a smooth hard surface rather than through vegetation that would take some of the force off of the rain drops. So, carefully consider the materials that you use for your landscape and gardening design — permeable pavers, porous asphalt, and wood decks all allow water to soak into the soil and help reduce runoff.
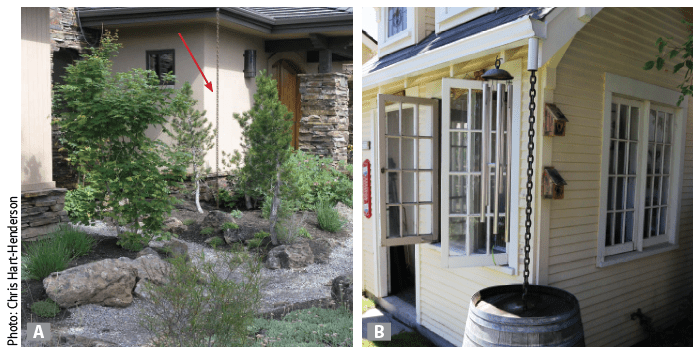
Design your site to manage stormwater in a way that benefits your water-wise garden and overall landscape concept. Consider catchments for water coming off impervious surfaces—for example, roof downspouts or rain chains leading to cisterns or barrels (Figure 3) that collect water that can be used later for irrigation.
For runoff not collected for later use, provide opportunities for water to sink into (infiltrate) the landscape. On the garden scale, simple stormwater infiltration systems can be integrated into the landscape plan in an aesthetic, recreational, and protective manner. For instance:
- A rain chain can feed a slightly concave, landscaped area that serves as a temporary detention basin, allowing runoff to slow down and supplement landscape vegetation.
- Permeable pathways can meander along a landscaped area to appear like a creek bed, creating an attractive multipurpose garden form (Figure 2).
- A sandy area used for a children's play area can serve as a shallow infiltration spot on the few days of rain events.
- Slot drains that direct driveway water to landscaping rather than into a garage or the street can protect structures and natural features.
By slowing down runoff and allowing it time to soak into the ground, stormwater brings more water to the plants and garden features that depend on water to thrive. For a step-by-step guide to incorporating a rain garden into your landscape, see Harvesting Rainwater for Use in the Garden and The Oregon Rain Garden Guide (in Resources). Consult the list of plants in this guide that are specific to Central Oregon stormwater management.
Step 2: Efficient irrigation
Once you understand and plan for how natural precipitation will play a role in your water-wise garden, the next step is to plan how to provide additional irrigation, if needed. If carefully managed, both manual and automatic irrigation can be efficient. Ensure that all irrigation stays on the intended target and does not result in overspray or runoff onto adjacent streets, sidewalks, or other hard surfaces.
Automatic irrigation
Generally, automatic irrigation is more time efficient and can save water if properly designed, installed, and maintained. The goal is to design the irrigation system so that plants are only receiving the water they need, with little to no excess. The irrigation should penetrate the soil and saturate the root zone without resulting in runoff or overwatering.
For manual irrigation, use a sprinkler attachment that best fits the shape of your yard. Avoid using sprinklers that throw water high into the air. This results in losing water to the wind and evaporation, and means you will have to run your sprinkler longer to get enough water into the soil. Sprinkler systems that emit water closer to the ground and the plants’ root system are more efficient.
If you are installing a new landscape, lay out your automatic irrigation system at the same time. Separate your turfgrass watering zones from other watering zones (hydrozones). There are four hydrozones—very low, low, moderate, and high. Plants are designated to a hydrozone based on their watering needs. Examples of plants placed in each hydrozone are listed in Table 1.
Table 1. Hydrozone descriptions
|
Hydrozone |
Supplemental water requirements |
Plant type |
|
Very low |
Required for plant establishment |
Most natives |
|
Low |
Some required during the growing season |
Perennials and some shrubs |
|
Moderate |
Regular amounts required during the growing season |
Fruit trees, ornamental trees, and shrubs |
|
High |
Regular amounts required during the growing season |
Turfgrass and vegetable gardens |
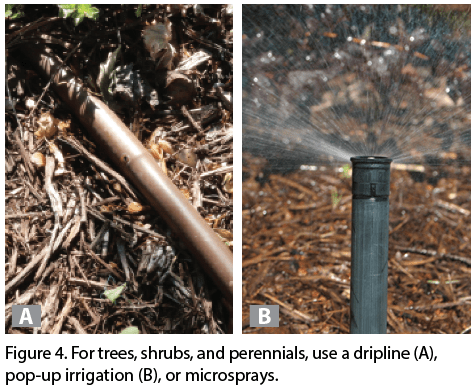
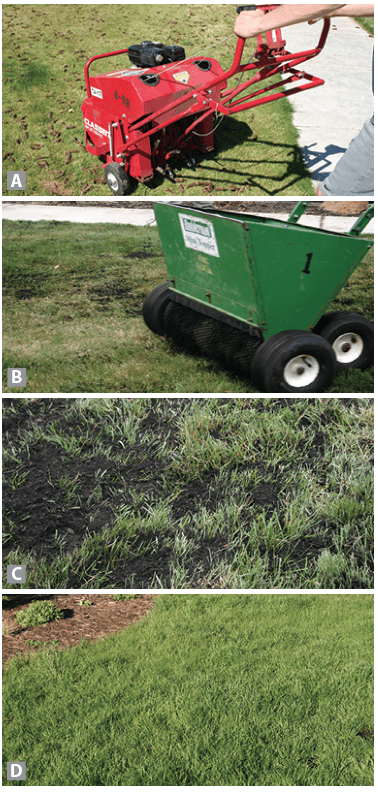
The best types of irrigation for turfgrass areas include low-pressure, low-precipitation-rate sprinklers that provide uniform and head-to-head coverage. For trees, shrubs, and perennials, use microsprays, drip emitters, or pop-up irrigation (Figure 4). Avoid the “set-it-and-forget-it” syndrome; adjust your automatic system throughout the season based on the plants’ water needs (e.g., less water in the spring and fall).
Be sure to maintain and repair your irrigation system throughout the growing season so that it remains efficient. Regularly inspect it for leaks, including inside any valve boxes. When making repairs, be sure to utilize irrigation sprinkler nozzles, valves, and other components that are consistent with your current system.
Irrigation controllers
Irrigation controllers have evolved over the years to include a variety of different technologies that can help you irrigate more efficiently. Smart-irrigation controllers automatically adjust irrigation schedules based on environmental conditions throughout the growing season.
These controllers utilize onsite sensors that detect conditions like rain, wind, and heat. They are often referred to as sensor-based, smart-irrigation controllers since they receive information from one or more onsite devices. Other smart-irrigation controllers receive a Wi-Fi, radio, cellular or satellite signal with environmental information that the controller interprets to adjust irrigation. These are often referred to as signal-based, smart-irrigation controllers since they depend on an external signal from somewhere other than the landscape.
Irrigation-controller technology will continue to advance and, like many other electronic home devices, become increasingly affordable and accessible through smartphones, tablets, and computers. However, no irrigation controller can compensate for a system that is poorly designed, installed, or maintained. Make sure your system is performing well and has no leaks before considering upgrades.
Deciding whether a smart-irrigation controller is right for you can depend on several factors. Are you good about adjusting your irrigation controller schedule every couple of weeks? If so, you may already be making enough “smart” adjustments. However, if you're not regularly adjusting your irrigation schedule or leave for extended periods of time, a smart-irrigation device might be a great way to reduce the amount of water you use for irrigation. Before investing in this type of system, you should also consider the installation and maintenance required by a high-tech controller. Onsite sensors require maintenance (e.g., you may need to occasionally clean debris away from a rain sensor or replace a solar radiation sensor after several years). Signal-based, smart-irrigation controllers typically avoid most sensor-maintenance costs but often come with a subscription fee or require your home's Wi-Fi data connection. The Environmental Protection Agency WaterSense-labeled, smart-irrigation controllers are third-party certified to ensure that they meet the WaterSense criteria for efficiency and performance.
How and when to water your plants
When watering your perennials, trees, and shrubs, consider deep watering every three to four days, as opposed to frequent shallow watering, to encourage the development of deep-rooted and more drought-tolerant plants. This is especially important during periods of drought. Ideally, you are saturating the soil 10 or more inches down in depth and watering the feeder roots of the plants. These are the roots that move horizontally through the soil profile and follow the dripline (the outermost circumference of a tree or shrub canopy where water drips onto the ground) of the plant out. Adjust your irrigation as your plants mature to make sure you are watering the feeder roots.
In Central Oregon, it is best to water in the early morning, when there is less wind and when any excess water on the plant will potentially dry off throughout the day. Take time to ensure that your irrigation is getting to the roots of plants by doing a soil moisture test prior to irrigating on a given day. Taking a hand trowel, dig down 8 to 10 or more inches in the dripline area of the plant and remove the soil. If the soil is dry and crumbly, then you may want to increase the time or output of your irrigation. If the soil is soggy and wet, then you can reduce the time or output (e.g., watering fewer days). If the soil is moist enough to stay in a ball in the palm of your hand, then you are probably watering sufficiently. Watering for turfgrass is different than watering for landscape plants; see the turfgrass section Step 4.
In times of extreme drought, prioritize your watering needs by watering trees first. Not only are they the most costly to replace, but they also provide significant environmental, social, and economic benefits. Their canopies may provide shade for your home and habitat for wildlife. Lawns, perennials, and shrubs are easier to replace, if necessary.
Step 3: Soil
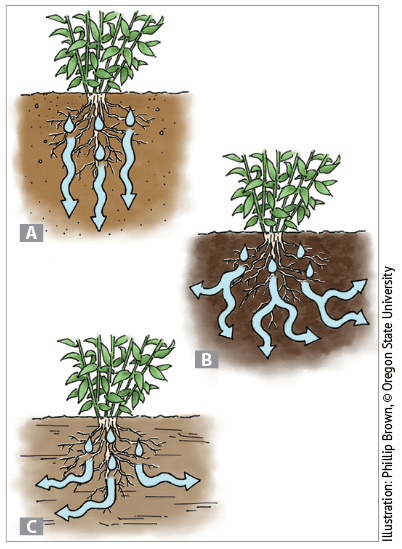
Knowing what kind of soil you have and how to improve it is critical for a successful water-wise garden. Healthy soil provides a nutrient-rich planting area, improves water holding capacity and aeration, and addresses drainage concerns. Water moves through soil differently depending on its texture. In gardening, there are essentially three types of soil: sand, loam, and clay. Each of these three soil types absorbs or takes in water in a different way (Figure 5):
- Sandy soil types—Water moves quickly and goes straight down through the soil.
- Loamy soil types—Water intake spreads down and out in the soil, which is ideal for plant roots to absorb water.
- Clay soil types—Water penetrates slowly and spreads out horizontally in the soil profile.
Determine what kind of soil you have in your yard and amend it accordingly. In Central Oregon, the soil is typically sandy and sterile with lots of rock. Water tends to drain right through the soil if left unamended. Regardless of soil type, the general rule of thumb is to amend your native soil with one-third organic matter, such as finished (fine-textured and well broken down) compost or well-aged manure that is free of herbicide residue.
The primary reason to amend your planting area in Central Oregon is to improve the condition of the soil, which will help with the initial root establishment of your plants. By creating an ideal soil environment for the root system of your plants you can potentially increase the plants' ability to become more drought-tolerant. When preparing a new area for non-native plants or turfgrass, till 1 to 2 inches of organic matter into the native soil to a depth of 6 or more inches (3 cubic yards per 1,000 square feet). Mix the native soil with an amendment and backfill the area. Your soil is now ready to plant with beautiful water-wise plants. Since native plants are adapted to native soils, they generally do not require additional soil amendments when planting.
Step 4: Turfgrass and turfgrass alternatives
Yes, you can have turfgrass in your water-wise garden! How much and what kind you use, and site preparation and maintenance will determine whether turfgrass is an efficient use of water.
Use turfgrass only where you need it, such as high-use or play areas. Use turfgrass on large, relatively flat areas, and not along narrow paths, in median strips, along foundations or on steep slopes. The benefits of using turfgrass include its ability to reduce soil erosion, noise, ground surface temperatures, and glare. It is also one of the best plants for creating a defensible space around your home when designing a fire-wise landscape. Additionally, turfgrasses, when properly maintained, can reduce runoff and help increase water infiltration into the soil profile.
Warm-season grasses (e.g., buffalograss, zoysiagrass and Bermudagrass) have better drought resistance than cool-season grasses (e.g., turf-type tall fescue, Kentucky bluegrass and perennial ryegrass). However, in Central Oregon, the warm-season grasses do not readily establish because air and soil temperatures are too cold during the growing season. For this reason, cool-season grasses, which are more adaptable, are commonly used instead. These grasses green up more quickly in spring but go dormant more quickly under drought-like conditions, thus requiring supplemental irrigation. Of the cool-season grasses, turf-type tall fescue is more drought tolerant than fine fescue, perennial ryegrass and Kentucky bluegrass, alone or in combination (Figure 6A).
Site preparation and irrigation design should be carefully considered to effectively reduce water use in lawns. Whether using grass seed or laying sod, the site should be sufficiently amended and prepared to allow for good root establishment. Take care not to compact the soil. For more information see Practical Lawn Establishment and Renovation and Efficient Irrigation in the Intermountain West (see Resources).
Water requirements for turfgrass are different than those for other plantings. When watering turfgrass, you will likely be watering to a depth of 6 to 8 inches. Avoid overwatering and irrigation cycles that result in runoff. Short run times that are too short may result in shallow-rooted stands of turfgrass that will not be as drought tolerant. The most common types of turfgrass used in Central Oregon require anywhere from 1½ to 2 inches of water per week (which can be applied incrementally throughout the week) during the warmest months of the growing season.
There is a direct correlation between mowing height and root depth in stands of turfgrass. The taller the grass, the deeper the root system. Be sure to consider the proper mowing height for the type of grass you have to encourage deep, more drought-tolerant roots.
One of the challenges in maintaining a more drought-tolerant stand of turfgrass is the buildup of thatch. Thatch is the combination of dead stems, roots, and some leaf tissue (not including lawn clippings). It builds up more quickly in Central Oregon as compared to other places because of the sterile native soils that lack the soil microorganisms that typically break down thatch. As a thatch layer builds, it becomes more difficult for water to move through it. Because turfgrass roots are below the thatch layer, you may need to water longer to sufficiently water your lawn.
One of the better ways to maintain a normal, quarter-inch layer of thatch is to routinely core aerate the lawn and then add a thin layer of fine, finished compost using a compost roller. This will provide beneficial nutrients and microorganisms to the soil (Figure 7). Additionally, it is recommended to use a mechanical dethatcher every two to three years, in the spring or fall, to remove some of the thatch layer.
Research suggests that a small planting of trees that partially shade irrigated urban lawns may help save water in semi-arid irrigated environments. Different types of grass require different amounts of water, so adjust your irrigation schedule accordingly. If you already have an existing lawn, consider reducing areas that are not needed and replacing them with permeable pavers or plants that require less water. Alternatives to turfgrass include wildflower areas or low-growing perennials (Figures 6C and 6D).
Step 5: Plant selection
Most people choose plants based on their flower color, light requirements (sun or shade), fragrance or overall appearance. While these are all valid reasons to select plants, you should also consider a plant’s water use and its adaptability in the landscape. Group plants with similar water, soil, and sunlight requirements into the same hydrozones (Figure 8).
When choosing a plant for your yard, consider its native environment. Then ask yourself, “Is this an environment I can easily mimic in my own yard?” If it will take a lot of resources and time to keep that plant alive, it is probably not a good choice. Consider choosing plants that naturally grow together (natural plant associations) or those that require the same type of care (cultivation) or both. Research suggests that native plants are not necessarily more water efficient or more drought tolerant than non-native plants when planted in a well-irrigated landscape. However, native plants have value beyond water use; they support natural ecosystems by providing food and habitat for native pollinators and wildlife.
Ideally, it is best to select plants that can survive with existing or minimal supplemental resources. When choosing non-native plants, make sure they are non-invasive. Invasive plants can potentially displace native plants, causing both environmental and economic damage.
The mature size of plants is another important factor to consider. This is especially important when selecting trees and shrubs. Be sure to allow enough space for a plant to fill in without having to severely prune it or move it as it matures.
In Central Oregon, consider plants that are more commonly grown in the Intermountain West instead of the Pacific Northwest. Choose plants that are adaptable to your area and right for your USDA hardiness zone. According the USDA hardiness zone map, Central Oregon is placed in the USDA Hardiness Zone 6, meaning plants are able to withstand temperatures from 0°F to 10°F during the winter months. This placement, however, is oversimplified given the region’s many microclimates; instead, select plants placed in the USDA Hardiness Zone 3–5.
Finally, keep in mind that increasing plant diversity in the landscape will increase the diversity of native, beneficial insects and wildlife, which helps minimize plant damage from insects and disease. Consider including plants with different functions (e.g., plants that have edible fruit, are fire- or deer-resistant, provide fall color, aid in stormwater management, and attract native pollinators and beneficial insects) to increase the diversity of the landscape.
Step 6: Mulching
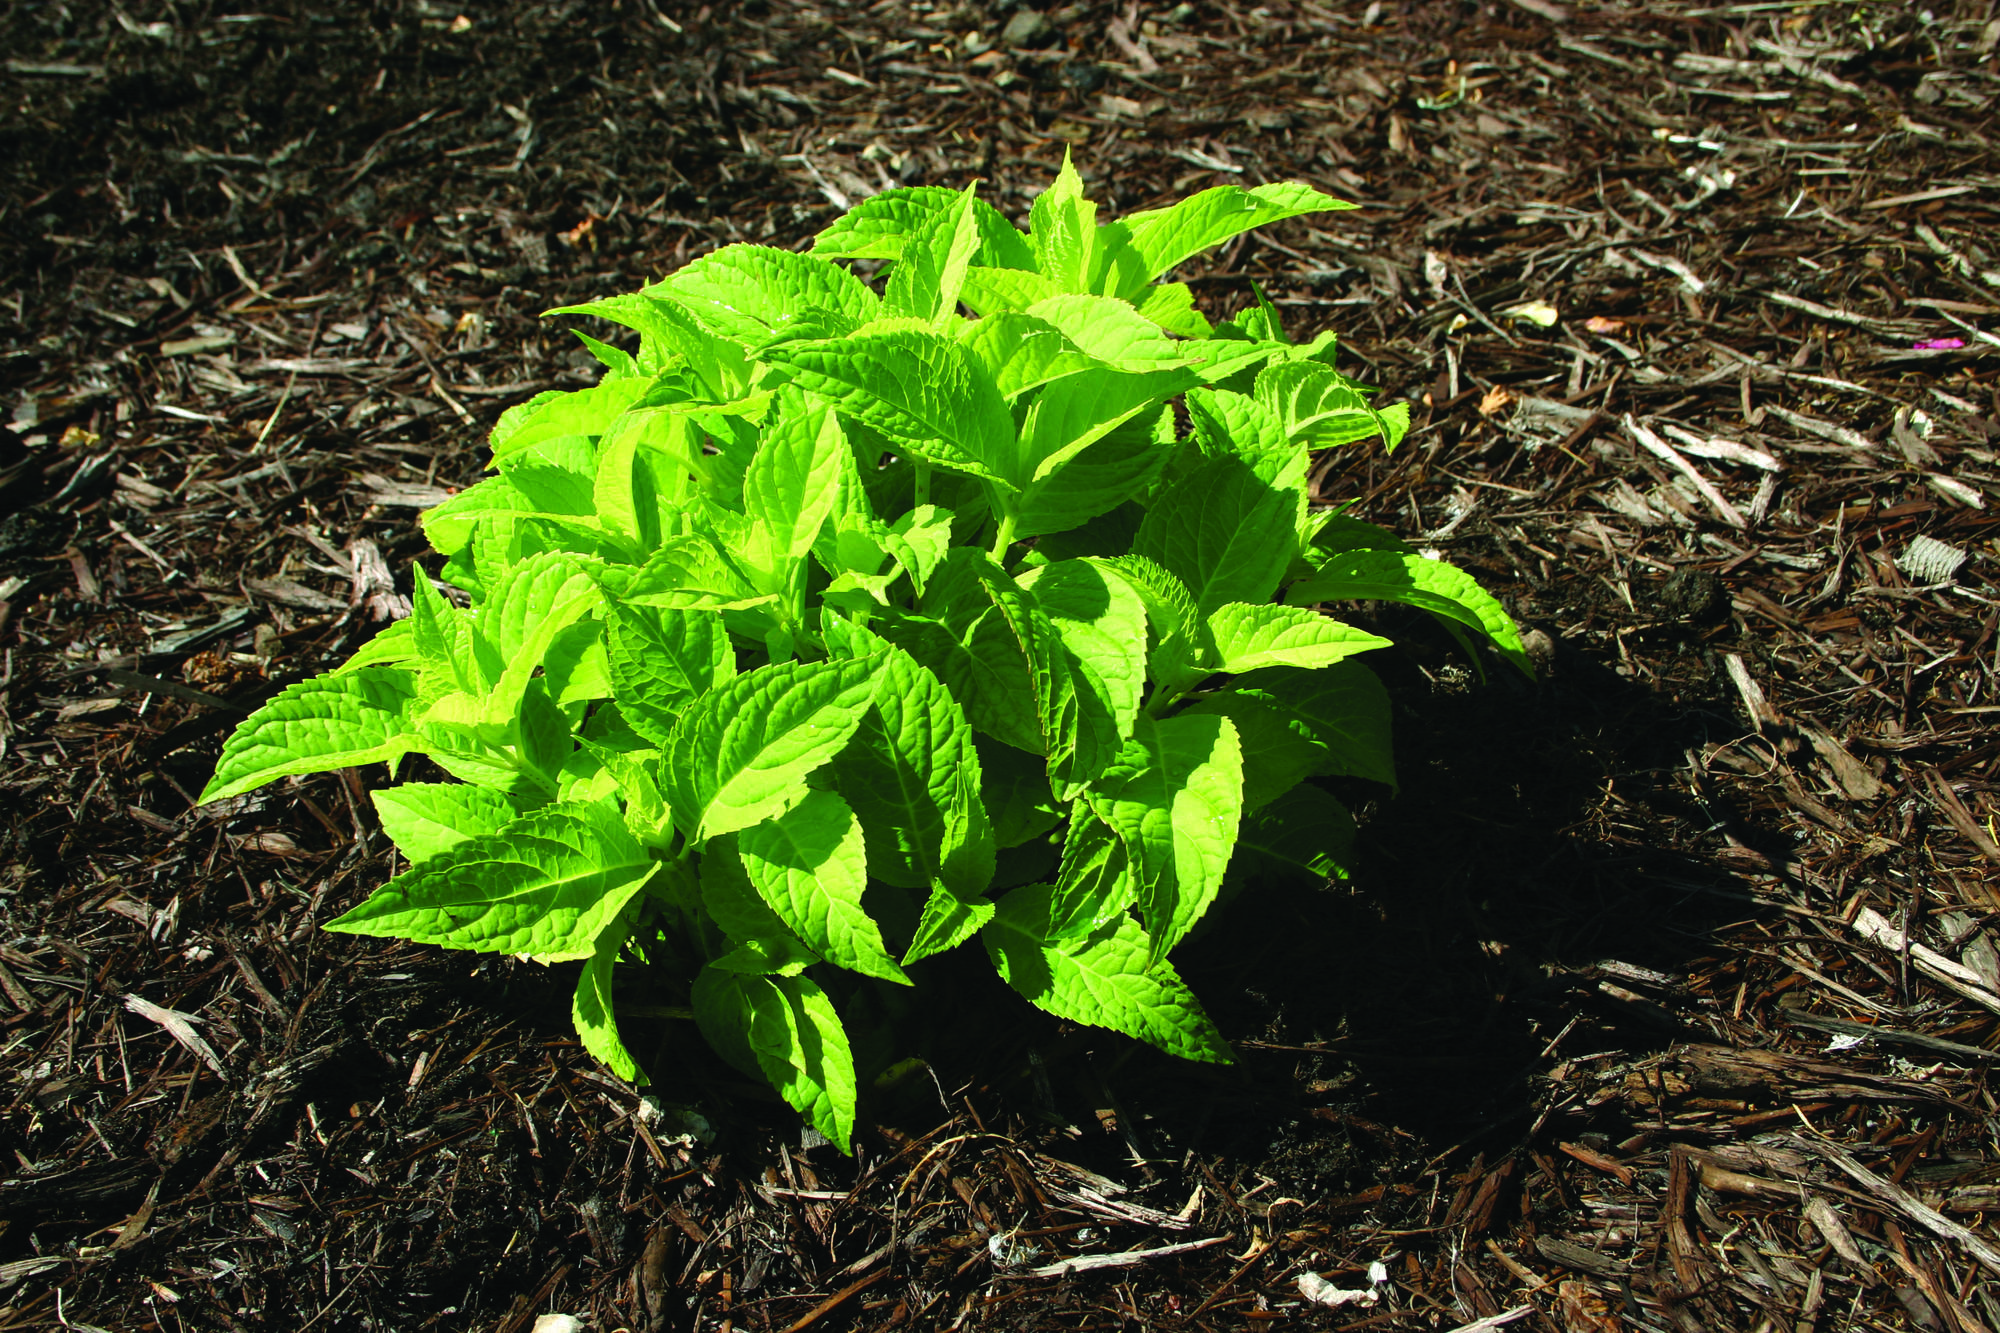
The next step requires using mulch as a top dressing for all of your trees, shrubs, and flowers (Figure 9). Mulch helps reduce weeds, minimize evaporation (water loss from the soil), cool the soil, and prevent soil erosion. What kind of mulch is the best to use? Mulches are available in many shapes, sizes, and colors, including bark chips, post peelings, compost, and rock. There are pros and cons to all mulches. For example, wood bark mulch returns some nutrient components to the soil over time as it breaks down, whereas rock mulch may stay in place better than fine or small bark mulches in windy sites.
The ideal application for a mulch layer is between 2 and 4 inches on top of the soil. You can do a 1- to 2-inch layer of nutrient-rich compost (e.g., fine textured and well broken down yard debris) with a 1- to 2-inch layer of wood bark chips on top. Some people use compost alone; however, because compost (as opposed to wood chips) is a good growing environment for seeds, you will potentially end up with a crop of weeds that will compete with your plants for water and nutrients. Whatever mulch type you choose, do not apply it in excess of 4 inches or you risk cutting off the oxygen supply to the plants’ root system, which can result in root death. Allow for some of the plant debris that falls off the trees, such as needles and leaves, to remain on the ground and provide a natural mulch or compost layer in your landscape beds. Periodically reapply mulch as needed and rake the surface of the soil to eliminate any compaction that occurs. Also consider using a high-quality landscape fabric covered with mulch in your beds to suppress weeds and minimize evaporation (which reduces how often you have to water). High-quality landscape fabric should be strong (polywoven, not stretchy) and breathable and allow water to flow through it.
Step 7: Maintaining your water-wise garden
All gardens, including water-wise ones, need routine, seasonal maintenance to preserve the beauty and health of your landscape. Maintenance includes pruning, mowing, watering, weeding, fertilization and regular monitoring for insect or disease damage. In general, water-wise gardens require less maintenance than traditional landscapes, especially as the landscape matures. A healthy, maintained landscape is also more resistant to drought, heat, freezing, disease and insects.
Irrigation system maintenance
Many people use water-wise principles to save water but fail to maintain their irrigation system and end up using more water. Improperly maintained irrigation systems can waste 50 percent or more of water. Sprinkler heads can break or become misadjusted. Drip systems can clog, get cut or moved. Plants and turfgrass can grow over irrigation heads and prevent systems from working as originally designed. Winters in Central Oregon can also take their toll on irrigation systems. Proper spring tune-ups and winterization are vital for keeping your irrigation system operating as efficiently as possible.
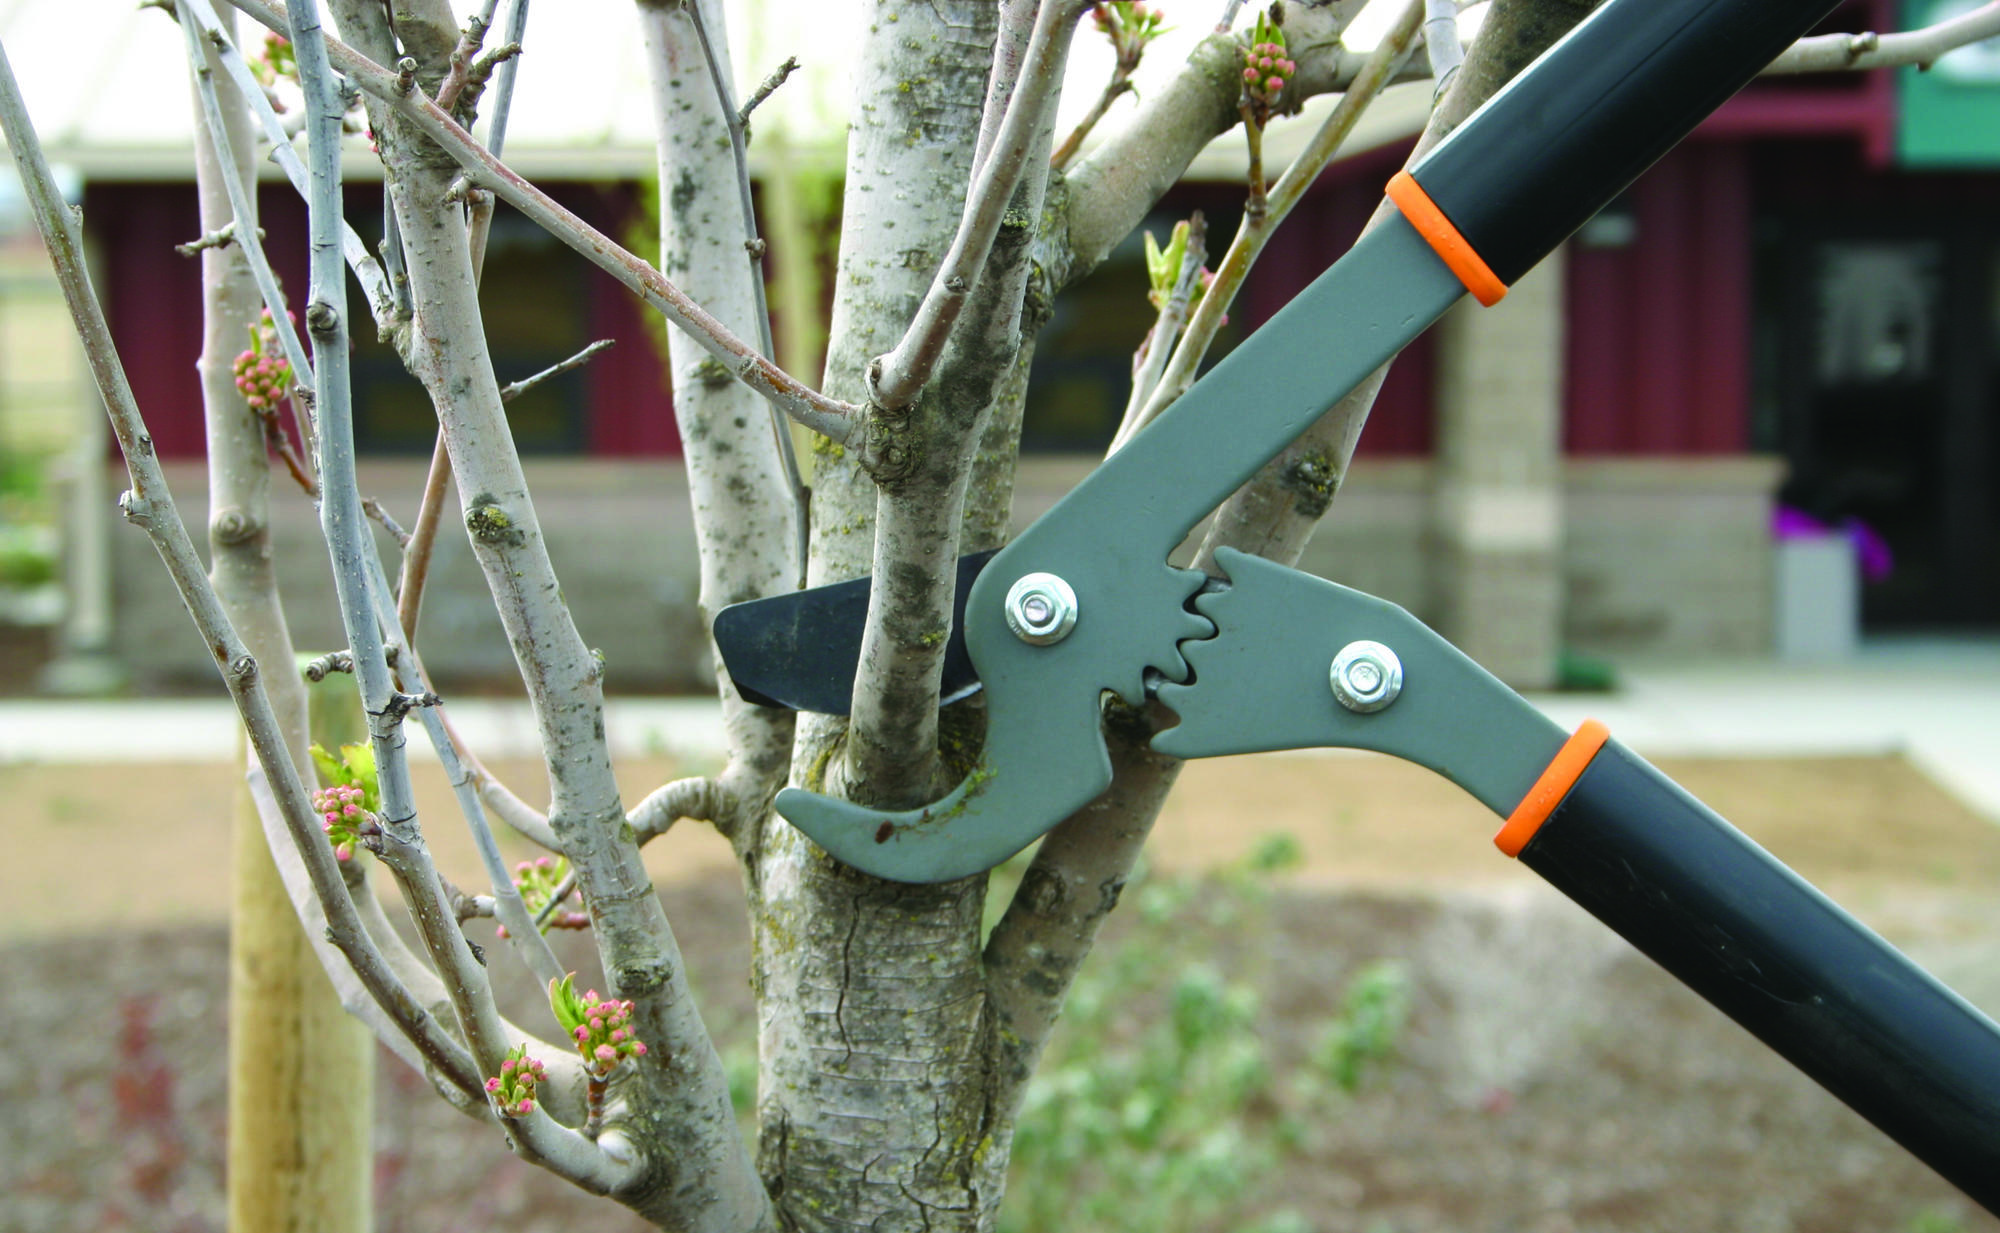
Pruning
Pruning is often done to shape and rejuvenate plants, eliminate future problems, and address safety issues (Figure 10). In general, pruning is done in early spring on deciduous trees, ornamental grasses and perennials. Prune conifers in late fall or winter to avoid attracting the sequoia pitch moth (not in flight in the winter) to fresh pruning cuts.
Mowing
Make sure you mow at the right height for your type of turfgrass; do not overwater or overfertilize your turfgrass area. Turf-type tall fescues, Kentucky bluegrass, perennial ryegrass and fine fescues can all be mowed at a height between 2 and 3 inches.
Watering
Winter watering is critical in a high-desert environment, where plant materials tend to dry out through the winter months. Be sure to water your new plantings every six to eight weeks when the ground is warm enough to absorb water. This is particularly important during a dry winter with minimal precipitation.
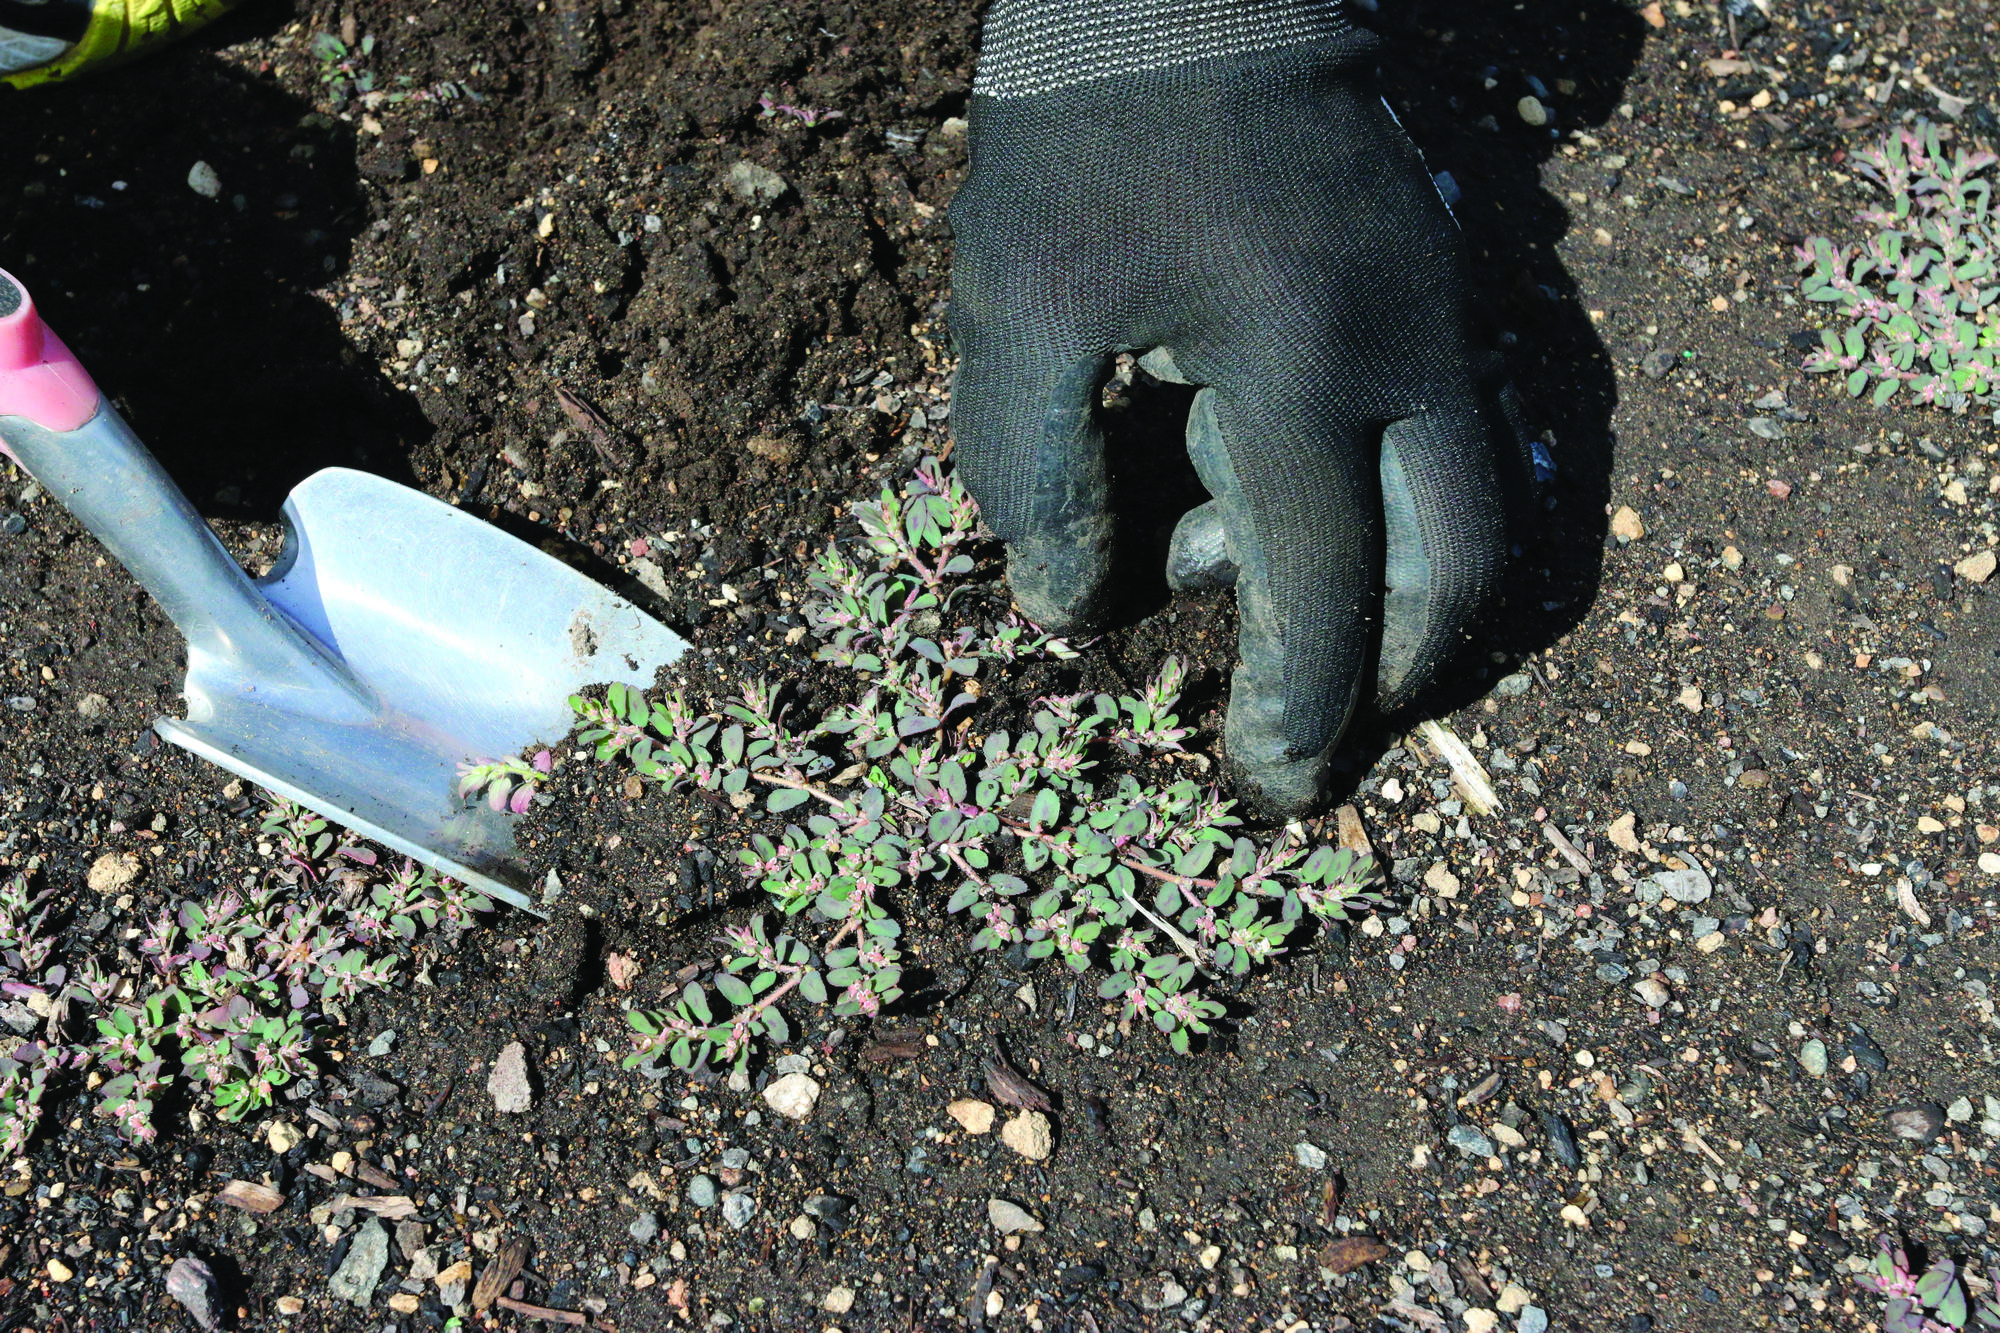
Weeding
Eliminate weeds to prevent them from competing with your landscape plants for water and nutrients (Figure 11). Prevent weeds from going to seed.
Fertilization
Trees, shrubs, and perennials can be fertilized once during the growing season in spring or early summer with a slow-release fertilizer. Avoid fertilizing in the late summer or early fall. Turfgrass can be fertilized more often (refer to Turfgrass Maintenance Calendar for Eastern Oregon in Resources). Avoid applying fertilizer or other garden chemicals before a rain or on a windy day. Sweep up and properly dispose of any excess; properly store garden chemicals under roofs. These steps will help protect our natural surface and drinking waters.
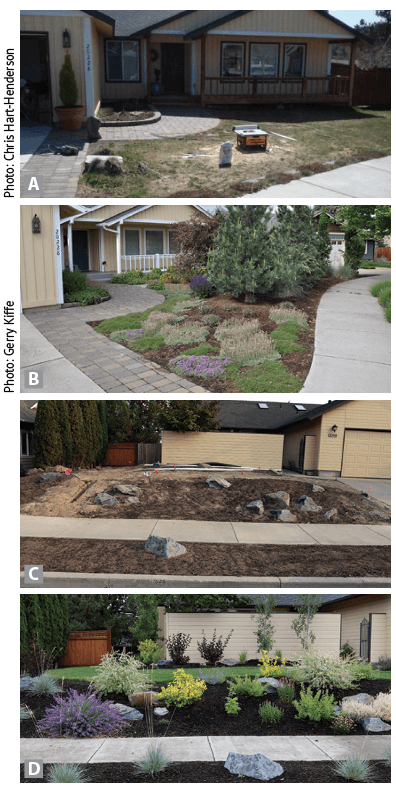
Retrofitting your existing landscape
If you already have a developed landscape there are several ways to adapt it to a water-wise garden. You can start by adjusting or upgrading your sprinkler system to a more efficient one. Also, take note of your irrigation schedule and adjust it according to weather conditions. You can continue to add plants that require low amounts of water to your landscape. You can also reduce the turfgrass areas that you do not use, converting them with permeable pavers or planting beds (Figure 12).
Plant lists
This guide was written specifically for Central Oregon (Crook, Deschutes, and Jefferson counties). To the best of our knowledge, the plants listed have not been found to be invasive in Central Oregon.
Resources
OSU Extension publications
- Conserving Water in the Garden (EM 9125)
- Keys to Water-efficient Landscapes (EM 9134)
- Landscape Maintenance to Conserve Water (EM 9135)
- It Pays to Water Wisely (EM 9133)
- Efficient Lawn Irrigation in the Intermountain West (EC 1638)
- Harvesting Rainwater for Use in the Garden (EM9101)
References
- The Oregon Rain Garden Guide: A Step by Step Guide to Landscaping for Clean Water and Healthy Streams
- Litvak, Elizaveta, Neeta S. Bijoor, and Diane E. Pataki. “Adding trees to irrigated turfgrass lawns may be a water‐savingmeasure in semi‐arid environments.” Ecohydrology 7.5 (2014): 1314-1330.
- Oregon Drainage Law — Central Oregon Stormwater Manual
- Turfgrass Maintenance Calendar for Central Oregon
- City of Bend — WaterWise
- City of Bend — Stormwater
2020
Extension work is a cooperative program of Oregon State University, the U.S. Department of Agriculture, and Oregon counties. Oregon State University Extension Service offers educational programs, activities, and materials without discrimination on the basis of race, color, national origin, religion, sex, gender identity (including gender expression), sexual orientation, disability, age, marital status, familial/parental status, income derived from a public assistance program, political beliefs, genetic information, veteran’s status, reprisal or retaliation for prior civil rights activity. (Not all prohibited bases apply to all programs.) Oregon State University Extension Service is an AA/EOE/Veterans/Disabled.
About the authors