Introduction
Spraying pesticides is an important task in the production of many agricultural crops. In specialty crops — defined here as fruits, nuts and ornamentals — spraying pesticides is even more critical. Arable crops such as wheat and soybeans can look less than ideal when harvested and still command market prices. Sales of specialty crops are dependent on a quality product that looks good. An improperly functioning sprayer can waste pesticide, miss part of the canopy or not apply enough pesticide, all of which can lead to wasted money and unsalable products.
Air blast sprayers are one of the most common sprayer types used in specialty crop production. These machines are designed for heavy use on farms, and like all machinery, require regular attention to function effectively. This publication highlights periodic maintenance tasks for air blast sprayers. This is a general maintenance guide meant to complement the manual that comes with many sprayers.
This publication is divided into sections on each sprayer component and reviews maintenance tasks and general intervals for each task. The document is arranged in order of frequency of required maintenance. Tasks requiring more frequent attention are at the beginning, and tasks requiring less-frequent attention are toward the end.
Sprayer safety
A pesticide is typically a mixture of several chemicals, even if only one chemical is listed as the active ingredient. Other chemical additives can help the pesticide adhere to plant surfaces, or stay suspended in water, but are not listed on the label due to being “inactive” on the target organism. Even if the active ingredient seems benign, the other components of the pesticide can be irritable or toxic to people.
Whenever working on or cleaning spray equipment, go through a list of pesticides used in the sprayer and examine their labels to determine the personal protective equipment each requires. There are often trace residues of pesticides on sprayers, so wear a combination of personal protective equipment that matches or exceeds that of the pesticides used, even if the sprayer appears clean. Always wear eye protection when servicing sprayers to avoid any spray or residue getting into your eyes.
Protect yourself
When doing maintenance on sprayers, use a combination of the personal protective equipment
listed below based on the labels of the pesticides used in the sprayer.
- Coveralls.
- Chemical- and water-resistant boots.
- Chemical- and water-resistant gloves.
- Safety glasses.
- Respirator/dust mask.
- Headwear such as a hood or hat.
Frequent sprayer maintenance tasks
Internal sprayer cleaning
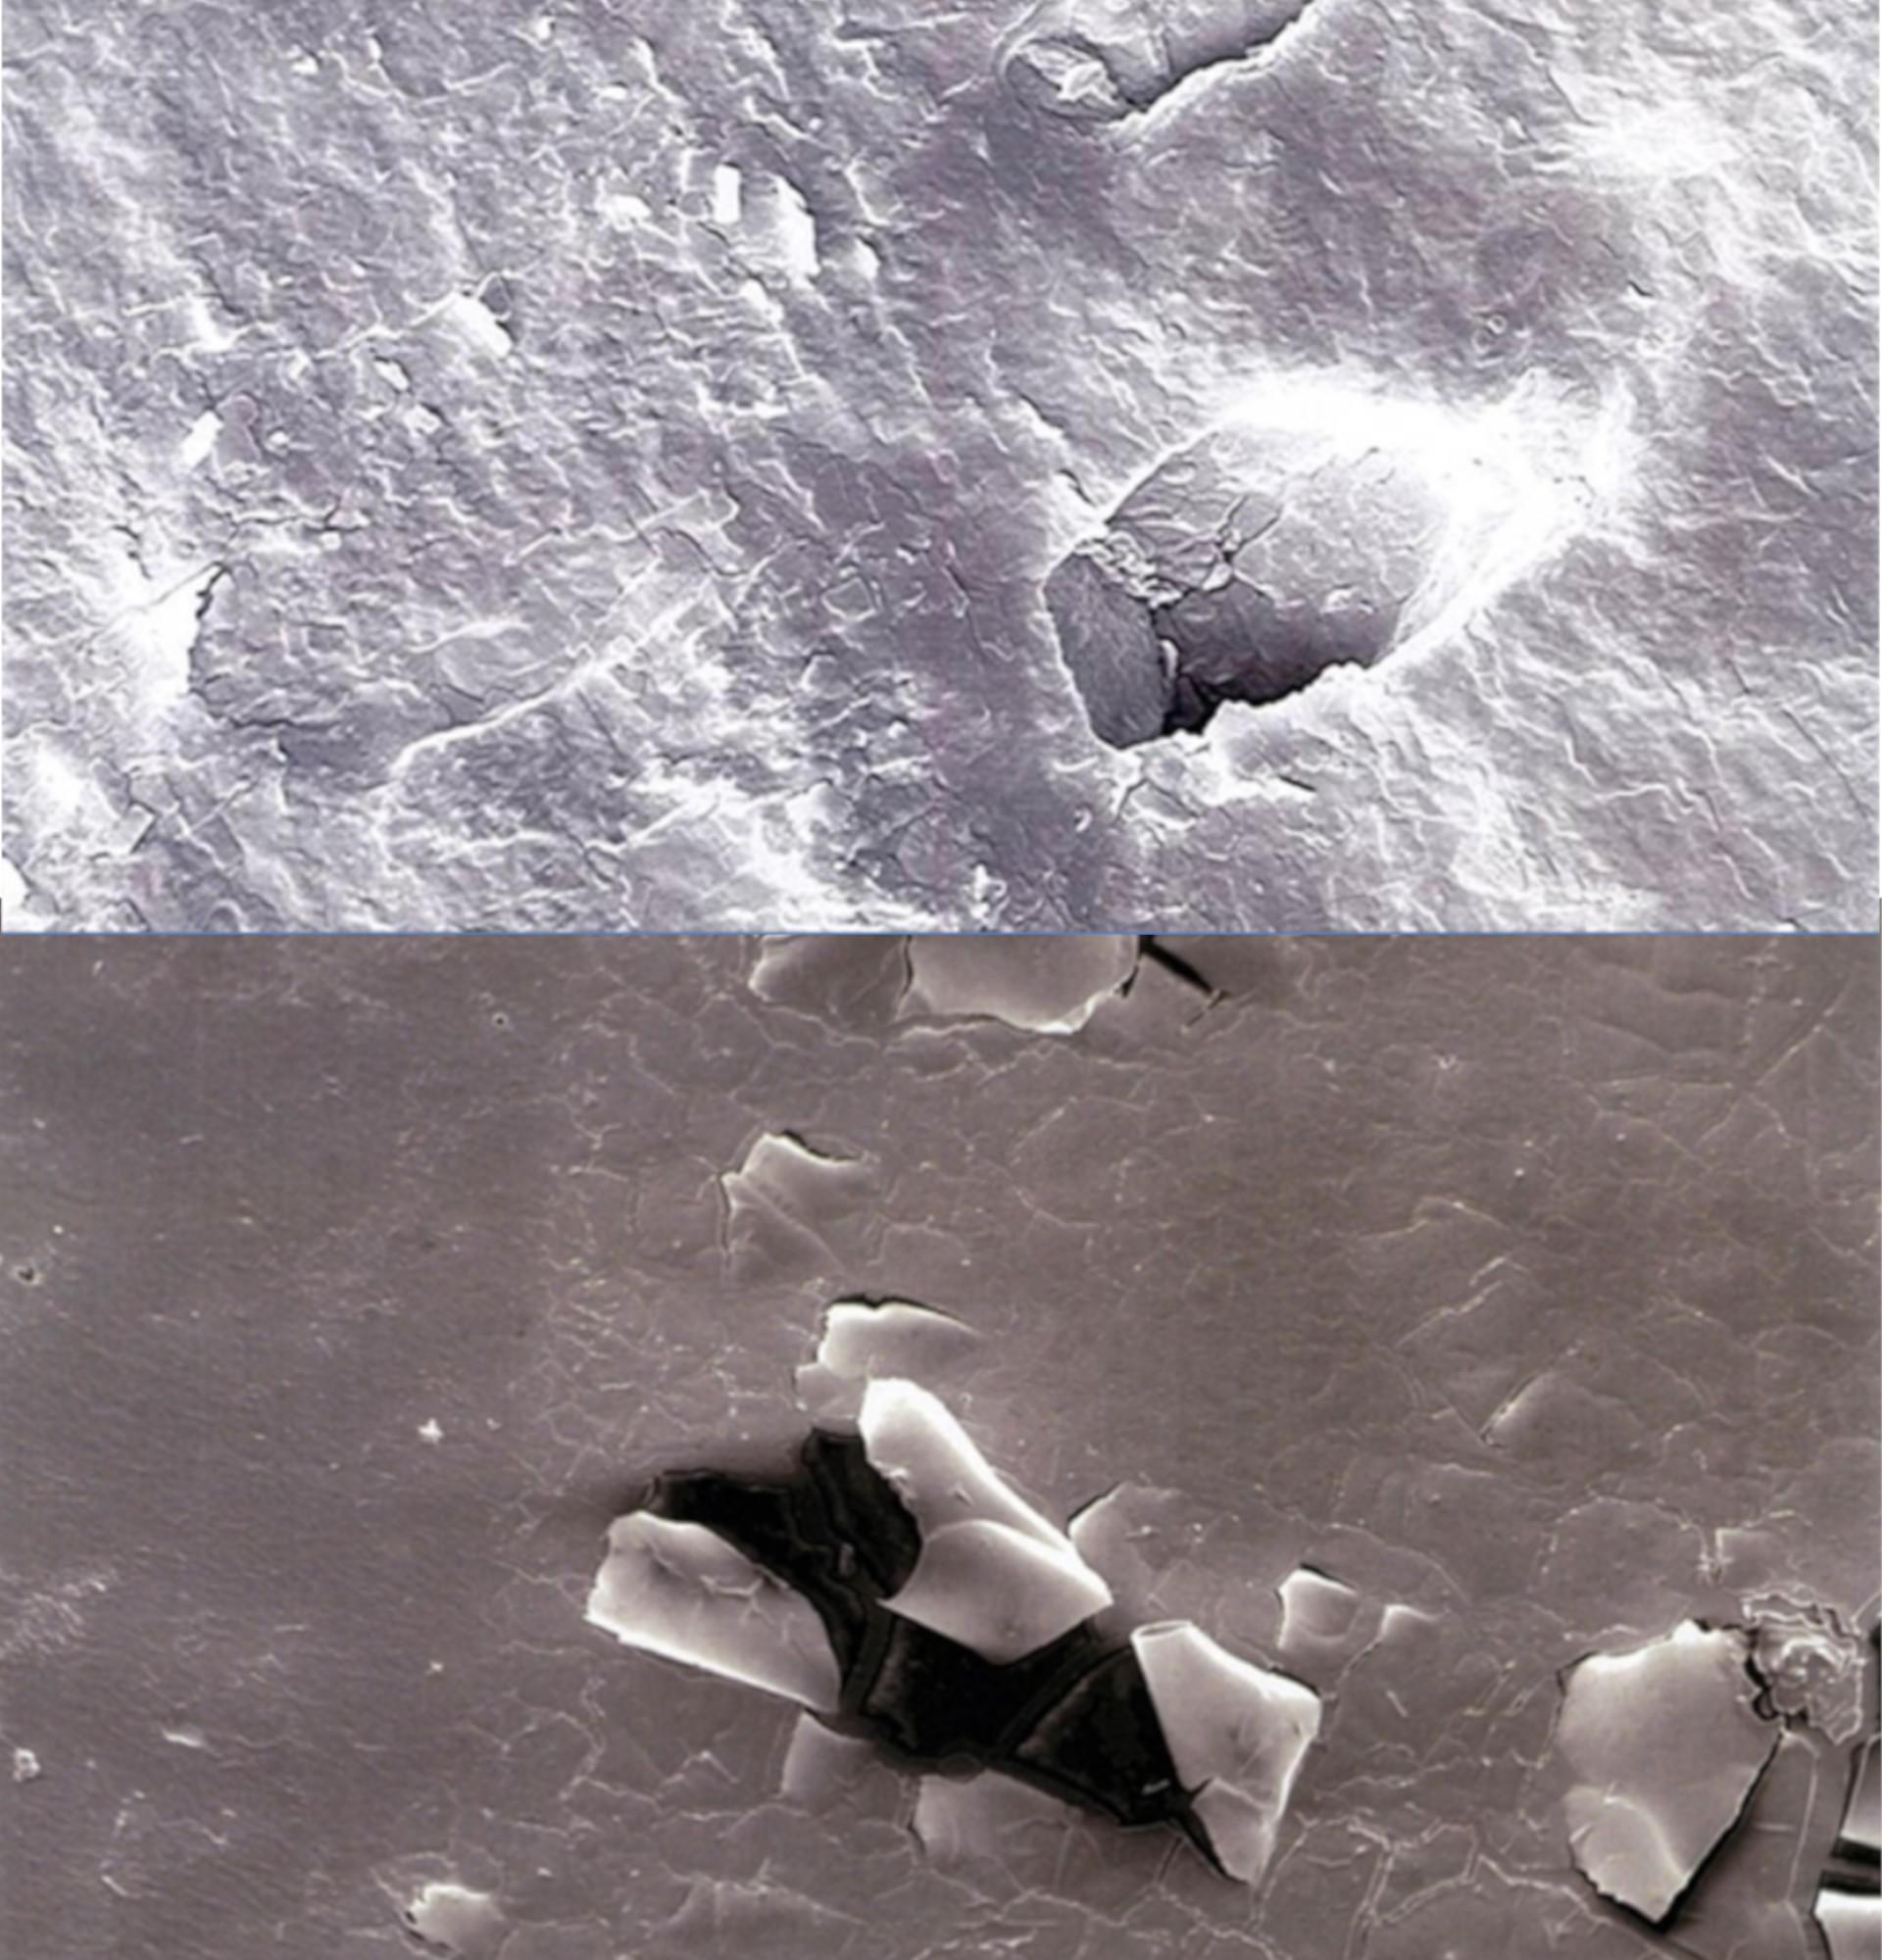
After a pesticide application, remove the pesticide mixture from inside the sprayer tank and plumbing as quickly as possible. When the pesticide mixture remains in the tank, there is more time for the chemicals to settle out of suspension or adhere to the walls of the sprayer tank or hoses (Figure 1). To prevent this, focus the cleanout on the tank and plumbing.
First, spray out any excess pesticide by applying to the target area if it does not conflict with label restrictions and will not cause phytotoxicity. After emptying the sprayer, a series of three rinses of about 10% of the sprayer volume capacity is the best practice to remove residue from the tank and hoses.
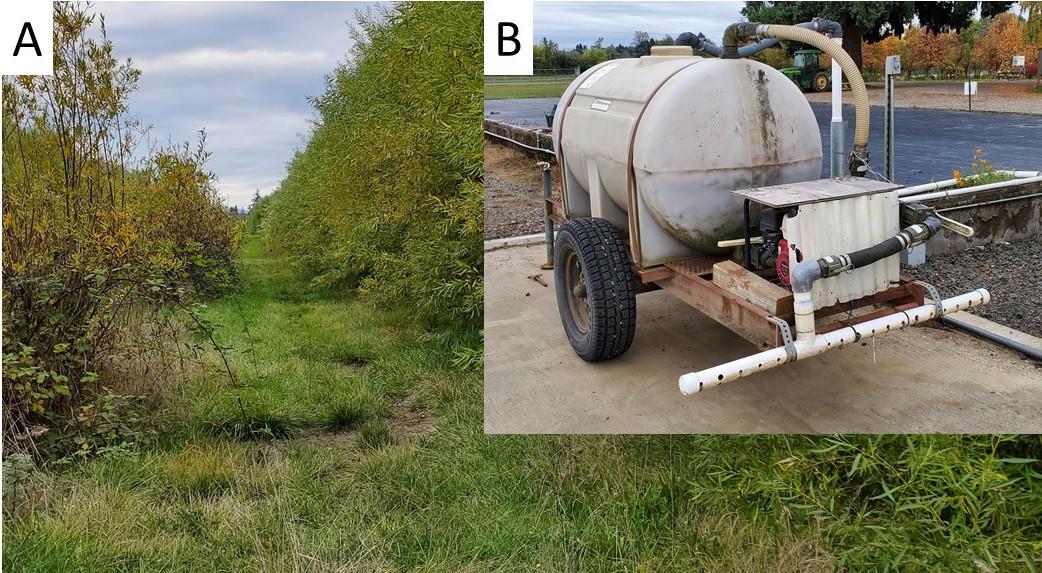
When adding rinse water to the tank, use a hose with a spray nozzle and make sure to wear eye protection. Spray down the inside of the tank to remove residue stuck to the sides. With the rinse water in the tank, run the recirculation to ensure the whole system is rinsed with clean water. Raise the tractor throttle or sprayer pressure to the settings used while spraying, and let the rinse water recirculate for a few minutes. Then (with the fan off) spray for a minute to purge the nozzles. After each rinse is completed, apply the rinsate to the treated area, or a wind-block row set aside for that purpose (Figure 2, page 3) or empty it onto a biobed.
Biobeds are pits in the ground that are filled with a mixture of straw, soil and compost, and usually planted over with a turf grass. When pesticide rinsate is dumped in a biobed, the microorganisms that are present degrade the pesticide residues and decrease the risk of pesticide runoff.
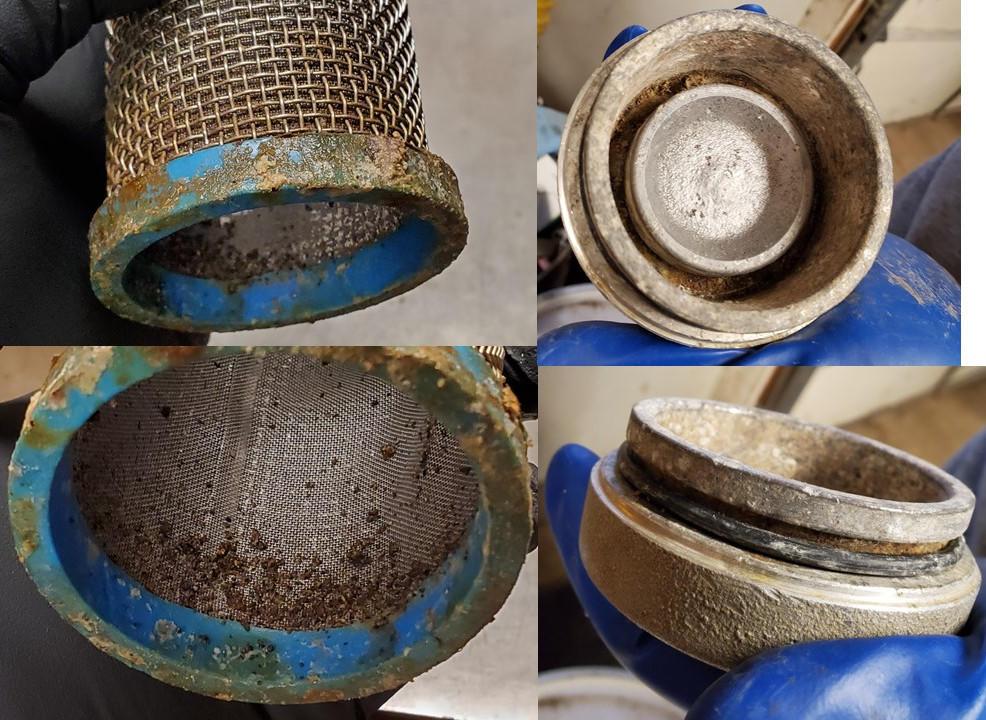
Between rinses, clean the suction strainers and basket strainers on the sprayer (Figure 3, page 4). Some sprayers have two in-line suction strainers, one before the pump and one after; others have only a single suction strainer. Remove the strainer from the housing and rinse with water. Note any debris or pesticide residue clumps, which could indicate other problems such as improper agitation. Also, remove the basket strainer from the top of the sprayer and examine it for any debris that could be present from the water source, then spray clean with water.
During the third rinse of the spray tank while recirculation is on, open up the spray tank and examine the water. Is it clear? Or is there a color or cloudiness to it? If the rinsate still is not as clear as the clean water after three rinses, this could indicate the presence of pesticide deposits somewhere in the sprayer plumbing. Pesticide deposits in the sprayer plumbing could be due to inadequate agitation or the nature of the pesticide. Wettable powders such as micronized sulfur can leave a buildup of settled pesticide in the tank or suction strainers. Check the suction strainers and try another rinse; if the water is still cloudy, spray-tank cleaner may be needed.
Spray-tank cleaners typically combine a detergent and ammonia to solubilize and remove tough pesticide residues. The ammonia raises the pH of water, which can help dissolve some pesticide products. The detergent helps to remove oily residue from formulations such as emulsifiable concentrates. Some spray-tank cleaners contain only ammonia and some only contain a detergent, so make sure when purchasing them that they will work for the pesticides that were used. The pesticide label will typically suggest a spray-tank cleaner if needed.
If you don’t have spray-tank cleaner on hand, you can make your own by mixing household ammonia at a ratio of 12.8 fluid ounces per 10 gallons and combining it with a detergent such as trisodium phosphate or similar that has been mixed at a ratio of 12 ounces (340g) per 10 gallons. Use the spray-tank cleaner in the same way as the rinses described above. Letting the cleaner sit in the sprayer for up to 12 hours can help solubilize tough residues. After using tank cleaner, drain it from the system and flush the system with clean water three times as described above to remove tank cleaner residue.
Ammonia is corrosive and should not be used on sprayer parts sensitive to corrosion (such as brass, cast iron, aluminum or galvanized steel parts). Brass parts can include nozzles and caps, ball valves, pressure regulators and hose connectors. Galvanized steel can be found on sprayer fan housings or grills, other protective shielding or various structural components. Some manufacturers use galvanized steel for those various components and others use stainless steel. If there is pesticide residue on corrosion-sensitive parts, use a detergent solution without ammonia for cleaning. Never use chlorine bleach for cleaning the sprayer unless the label clearly indicates to do so.
Spray tank dilutions
Dilution factor equals volume remaining plus clean water divided by the volume remaining.
For example: Three gallons of pesticide left in tank and hoses. Twenty gallons of fresh water is added, recirculated, then drained. The dilution factor is equal to: (3+20)/3=7.67
If this procedure is repeated three times, that’s an overall dilution factor of 7.67 x 7.67 x 7.67 =450
If a single rinse of 60 gallons was performed on the 3 gallons of pesticide left: (3+60)/3 = 21.
The triple rinse had 21 more times dilution power than the single rinse of 60 gallons, with the same volume of rinse water!
External sprayer cleaning
After completing a spray, there will be pesticide residue on the sprayer. This is especially evident with powder-based formulations. Washing off this residue as soon as possible after the application prevents chemicals from adhering to the sprayer and corroding sprayer parts.
One of the easiest ways to quickly remove pesticide residue is to use a pressure washer. Thoroughly wash the outside of the sprayer until no pesticide residue is visible. Use different angles to adequately penetrate narrow and difficult-to-reach areas. Use caution when pressure washing to avoid damaging fragile or moving parts such as bearings, belts/tensioners, electronic housings and the sprayer engine or gearbox. Hand washing with a standard detergent (such as Simple Green) and a long-handled scrub brush is best for cleaning delicate sprayer parts. If a pressure washer is not available, a hose with good water pressure and a spray nozzle can often do an acceptable job.
Weekly tasks or before every application
Nozzles are the most important part of the sprayer. They determine the size and pattern of droplets that the sprayer will emit, which greatly influences spray coverage. Regularly examine the spray pattern, either from inside the tractor (an over-the-shoulder check), or from a bystander location (wearing appropriate protection equipment).
When observing from a bystander location, the sprayer can be moving through the field during an application or it can be stationary, such as during sprayer cleanout.
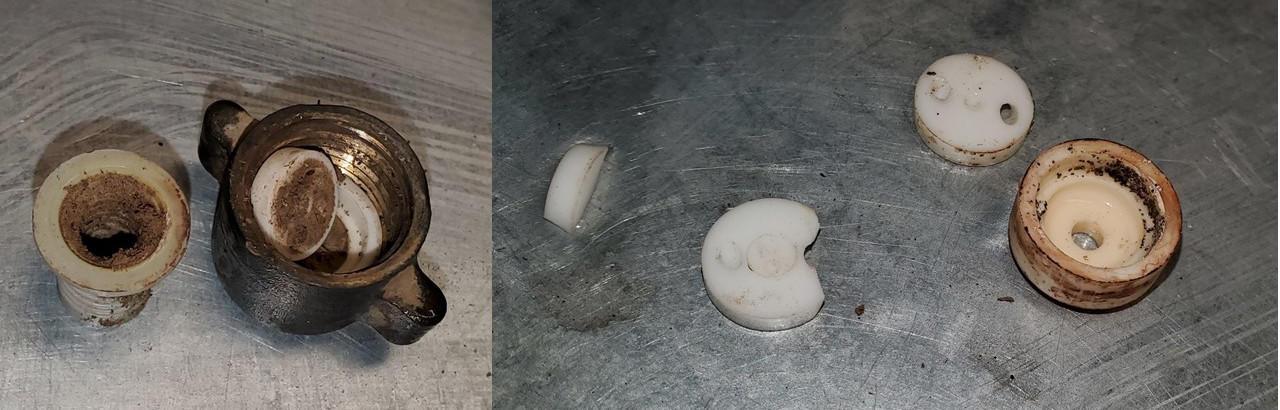
Look for an even shape of output from each nozzle and a uniform plume of spray. If there are breaks or variations in the spray plume, examine those nozzles. Nozzles emitting abnormal spray patterns may be clogged at the nozzle or at the strainer before the nozzle (Figure 4). To clean nozzles, place them in a warm water solution with some detergent (the same detergent used to clean the sprayer) and scrub them gently with a soft, plastic-bristled brush to remove any residue or scale. Alternatively, compressed air can be used if the contamination is more superficial.
The life span of a nozzle varies depending on the type of pesticides used, sprayer pressure during use, frequency of use and nozzle material. Nozzle materials ranked from most durable to least durable are: ceramic, hardened stainless-steel, brass and polymer. Ceramic nozzles are generally good for two seasons or more, while stainless steel may be reliable for one to two seasons, and brass and polymer are reliable for one season or less. Nozzle life span depends on the frequency of use and the products used.
Disc-and-core nozzles are often used in air blast sprayers (Figure 4), and come in the full range of materials discussed. Molded plastic nozzles with ceramic tips retain the longevity of ceramic disc-core nozzles and can be easier to clean and handle than disc-core nozzles because they are a single piece.
They also have other benefits such as being brightly colored for quick identification, having easier-to-read output rates and sizes on the nozzles, and they cannot be mounted backwards. There are also other molded nozzles with orifices made of stainless steel or polymer that come in hollow cone spray patterns, with air induction versions available.
Sprayer calibration should be completed at the beginning of the season. For more information on calibration, see Six Steps to Calibrate and Optimize Airblast Sprayers from Washington State University Extension. Calibrate the sprayer after adding new nozzles, changing the pressure or changing tractors. More than one calibration may be needed if you use the sprayer often during the season or the nozzles are made of brass or polymer.
A short walk around the sprayer each week or at each application will help catch small issues before they become larger ones. Adequate agitation helps ensure that pesticides are applied at a consistent rate. After each spray is completed but before washing out the sprayer, look into the tank to see if there is pesticide that has settled to the bottom. If present, this could indicate that there is inadequate agitation, mixing or recirculation.
Examine the fan after each application for defects such as nicks in the fan blades. Align air deflectors or scoops to direct spray toward the crop. Deflectors help direct air into the canopy while preventing leaves and dirt from being stirred up on the ground. This ensures that the fan blades stay clean and reduces the amount of dirt blown onto the crop. Another component that needs regular attention is the power take-off (PTO) shaft. Make sure that when the sprayer is connected to the tractor, the PTO shaft is level, and after each application grease the spline, tubes, universal joints and connection points to prevent seizing. A National Lubricant and Grease Institute (NLGI on packaging) No. 2 grease is the most common type used for this purpose, but check the sprayer user manual for more detailed information.
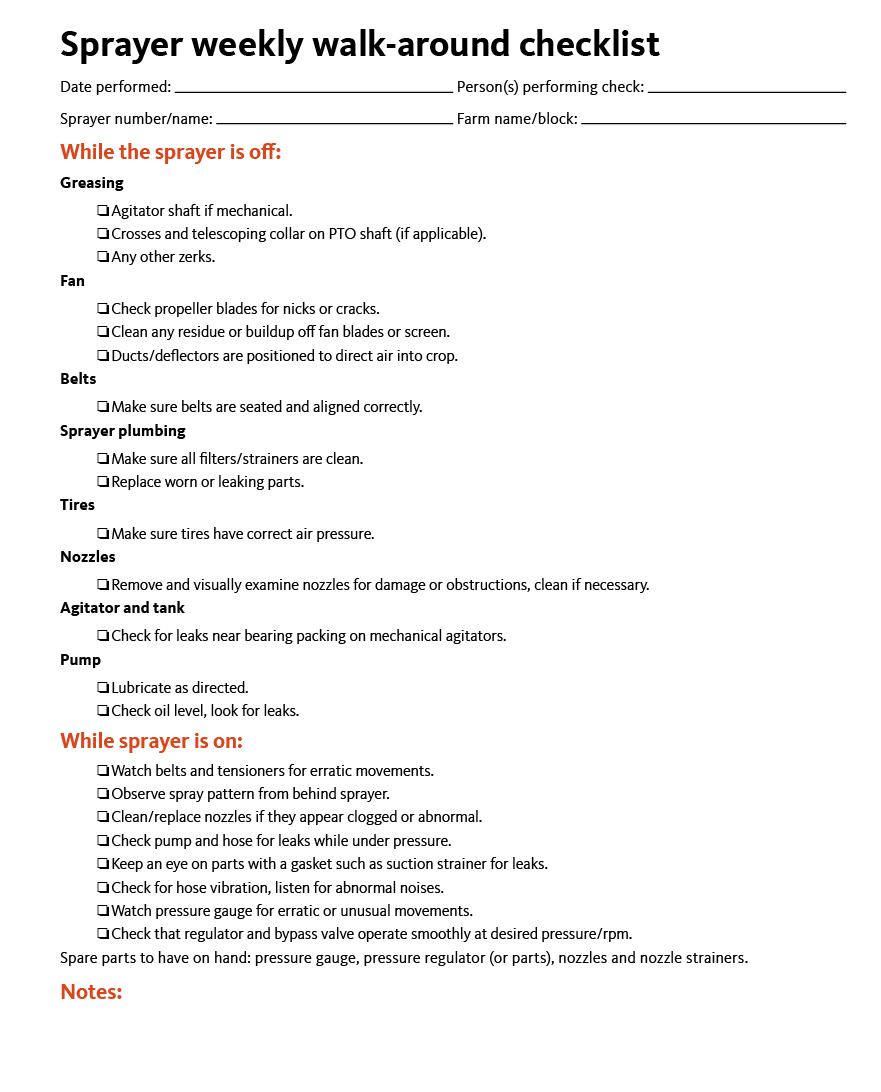
To assist with completing a weekly walk-around, refer to the checklist at the end of this publication. Print out copies of the checklist to keep records of when these checks were completed.
Tasks every three to six months
Sprayer pumps
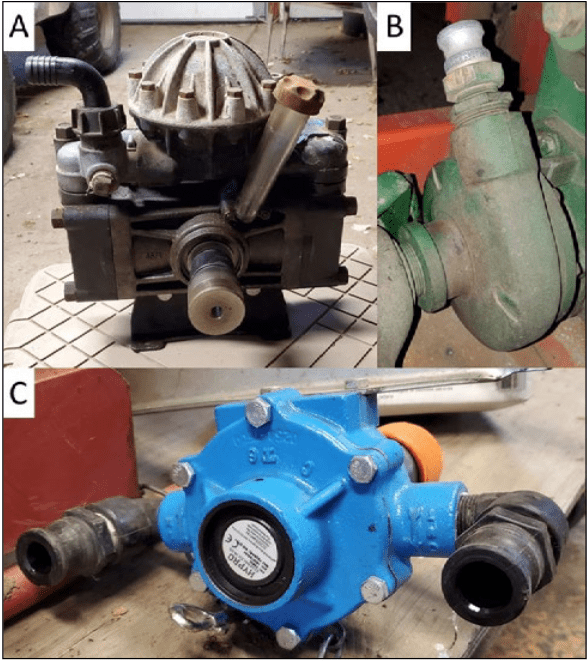
The three most common types of pumps on pesticide sprayers are diaphragm, centrifugal and roller pumps. Information on maintaining the sprayer pump typically comes with the sprayer when originally purchased — this information overrides the general information given here and should be followed. If the service manual on a pump was lost, it can usually be requested from the manufacturer or found online. Flush pumps clean of pesticide after each use using the triple-rinse protocol mentioned earlier.
Diaphragm pumps are among the most common pumps found on sprayers (Figure 5A). They are low-maintenance, fairly small for the amount of flow and pressure that can be achieved, and have piston chambers protected in oil and separated from the spray mixture. This makes them suitable for abrasive or corrosive pesticides. Pump diaphragms should be inspected for wear or stretching and replaced if necessary after 200–500 hours of use or at season’s end. Diaphragms typically last 1,000 hours. The two most common types of diaphragms are ethylene propylene diene monomer rubber (black in color) and desmopan (often amber in color). Ethylene propylene diene monomer rubber is more resistant to acids and corrosive materials, and desmopan has higher abrasion resistance.
Other diaphragm materials combine these properties but may be more expensive. Replace diaphragms with new ones made of the same material, unless the original diaphragm material performed poorly. When replacing diaphragms, always change the pump oil at the same time. When servicing the pump, check the air pressure in the dampening system. Air pressure should typically be about 10% of the operating pressure of the sprayer. For example, if the sprayer is operated at 100 pounds per square inch, the air dampener should have about 10 psi in it. A “water hammer” knocking noise when the sprayer is in use may indicate the dampening chamber pressure is too high or too low.
Regardless of whether the diaphragms need to be changed, replace the pump crankcase oil after 500 hours or at season’s end. Remove the drain plug and rotate the pump shaft to make sure all oil is out of the crankcase, then refill with the same type oil. Write the oil type on the pump with a paint pen to help you remember it.
Centrifugal pumps can produce large spray volumes (up to 200 gpm) over a pressure range of up to 180 psi (Figure 5B). Centrifugal pumps are simply constructed and durable, making them a good choice for spraying wettable powder and abrasive pesticide mixtures. Pumps can be made of cast iron, stainless steel or polypropylene. Stainless steel is preferred when applying acidic materials.
Centrifugal pumps are more expensive than other pump types, but their low maintenance and longevity make up for the initial investment. Maintenance for centrifugal pumps largely involves various routine checks to verify the pump is operating effectively. Check pump mounting bolts for tightness and examine the pump shaft alignment on a regular basis. Additionally, flow rate and pump vibration should be examined periodically. After the first 200 hours of use, the oil in the pump should be changed (if present), and every 2,000 hours of use thereafter. Check the owner’s manual for more specific recommendations. Centrifugal pump failure is typically first noticed as a reduction in spray volume or vibration of the pump.
Roller pumps (Figure 5C, page 5) are popular because of their low cost, ease of service and versatility. Roller pump components experience more wear than other pump types due to the internal components being in direct contact with the spray mixture and the friction on the rollers when the pump is in motion.
Pump seal and roller materials should be compatible with the pesticides being sprayed. Nylon or Teflon rollers are most resistant to agricultural chemicals and should be used on multipurpose sprayers, while rubber rollers work for water and wettable powder suspensions at pressures below 100 psi (Deveau, 2020). For short periods of inactivity, noncorrosive liquids can be stored in a roller pump. It is best practice to flush the pump with water or something to neutralize the spray mixture used, then drain the pump and plug ports to keep air out. The unit needs to be disassembled to examine the wear on a roller pump. This should be done if there are issues with the pump, such as low volume or pressure.
The two components to watch closely for wear inside of a roller pump are the rollers and the housing. When examining rollers, they should all be even in size and uniform in diameter along their length. Rollers can be measured and compared against their specifications to determine if there is significant wear on them. Check with the pump manufacturer for the correct diameter of the rollers. Roller life is shortened by abrasive pesticides such as wettable powders. Sand and scale in the spray water will also decrease roller and housing life. When replacing rollers, replace the whole set.
When looking inside the pump housing, look for wear where the rollers contact the housing. If there is a significant lip where the rollers contact the housing, the housing may need to be replaced. Roller pumps should be serviced every 500 to 1,000 hours of use, depending on the roller material and abrasiveness of pesticides used. When deciding to repair or replace a roller pump, if the repair kit costs more than half what a new pump costs, it will be better to get a new pump.
Other sprayer parts requiring periodic maintenance checks
Pressure regulator
Pressure regulators are used on positive displacement pumps (for example, diaphragm and roller pumps) to dampen pressure spikes from the pump strokes. Pressure regulators dampen pressure fluctuations with a spring contained within the pressure regulator housing. Because the spring is directly dampening the pressure of the pump output, it must be appropriately stiff for the working pressure of the sprayer.
Sometimes sprayers will be fitted with regulators that are designed for the highest pressures the pump is rated for. Other times, pumps or regulators have been replaced without matching the specifications of the previous components. In these cases, the regulator may cause the pressure to spike or be ineffective at regulating sprayer pressure.
Additionally, if the spring is too stiff, corroded, dirty or damaged, it can cause the pressure gauge to spike. This will typically happen briefly when the sprayer is turned off. If the regulator is dirty, cleaning and lubricating the spring will typically address the problem.
Replacing the spring in the pressure regulator with one designed for the sprayer operating pressures or replacing the regulator entirely will address the issue. Inspect the valve spring and seats once a year to determine if the regulator is in good working order.
Pressure gauge
Pressure gauges verify that the sprayer is operating correctly. Mineral oil-filled gauges are preferred, as the oil helps dampen vibrations from the sprayer and extends gauge life. Using a pressure gauge with a range of about twice the typical operating pressure makes it easy to read and verify the correct pressure.
A pressure gauge usually will last for multiple seasons. However, keep a spare on hand to replace a failed gauge and stay on schedule.
Keeping an eye on the pressure gauge can help detect other problems with the sprayer. Typical indications include the needle jumping erratically, the pressure not being maintained for the entire use of the tank or pressure spikes when the booms/manifolds are turned on or off. This could indicate a faulty pressure regulator, faulty pump or issues with sprayer pipe/tubing.
Hoses and pipe
Hoses should be checked for flexibility and wear periodically during the season as well as at the beginning and end. If there is cracking or nicks in the hose revealing part of the core material, the hose should be replaced. Hose material is susceptible to cracking from exposure to sunlight and freeze/thaw cycles. Hoses on sprayers stored outside will have a shorter life than those on sprayers stored indoors.
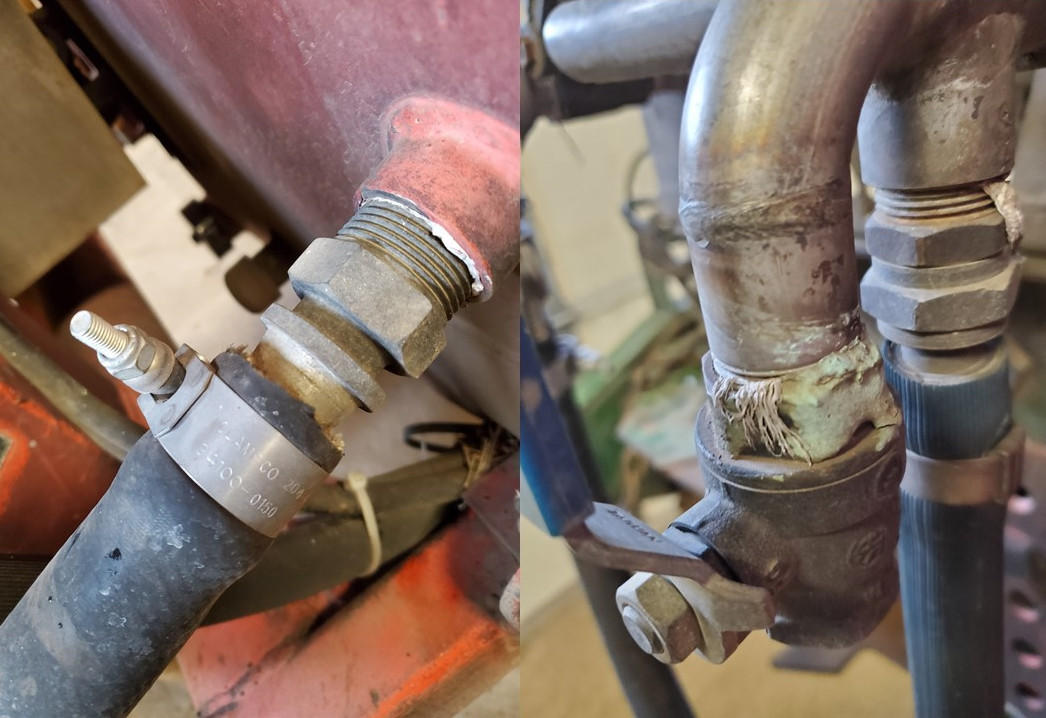
When replacing hoses, mark both ends of the hose with a paint pen so that it is clear where the hose starts and ends. Examine the ends of hoses to make sure they are securely fastened. Watch for corrosion or other wear on sprayer manifolds and other pipes (Figure 6). When modifying the sprayer, avoid placing hoses with different diameters in-line: when going from a larger hose to a smaller hose, a pressure drop will occur, and vice versa when going from a small to large hose. This can alter spray rates and pressures such that the sprayer may be applying an incorrect rate and/or a less-than-ideal spray quality.
Belts
Belts that run the various sprayer components should be checked regularly for signs of wear, proper tension and to ensure that they are aligned on their respective pulley wheels (Deveau, 2020). Look at the sprayer from a safe distance when it is operating and observe whether any belts or tensioners make erratic movements. If a belt does not have enough tension, it may jump around while in motion. Sometimes adding tension to the belt or making sure it is seated correctly will solve the problem; however, if there is significant cracking or wear and adding tension does not fix the problem, the belt should be replaced.
Wheels
If the sprayer is a trailer version with wheels, check the tires for signs of cracking and wear, and make sure they have sufficient tread. Check the tire pressure and adjust if necessary. Higher pressure provides less resistance when rolling but causes more compaction, while lower pressure disperses weight across a greater area with more traction but requires more pulling effort. Some wheels have adjustable heights, which can be useful to align the sprayer with the crop being sprayed or to help level the PTO shaft when connected to the tractor. Adjust as necessary.
After the season is over
Winterizing
Winterizing, or preparing a sprayer for any long-term storage, is an important step in increasing the longevity of a sprayer. Even in a mild climate, taking these steps before storing the sprayer for an extended period will help avoid problems.
The first step involves triple rinsing the sprayer much like one should do after a standard pesticide application. Fill the sprayer with 10% of its tank capacity of water, raise the pump pressure and circulate through all of the components, spraying the diluted rinsate out the nozzles after circulating for about five minutes. Water and pesticide often will settle into the “dead space” in the end of a boom or manifold and will not be removed by simply spraying the rinses through the nozzles. During one or more of the rinses, remove the cap on the end of booms or manifolds then engage the pump to flush water out of the ends of the manifolds. In addition, remove the nozzles and screens during this process to fully flush out any debris present in the sprayer plumbing. This procedure should be completed three times, or until the rinse water is clear.
Once the entire system has been rinsed thoroughly, an RV antifreeze with a rust inhibitor should be recirculated through the sprayer plumbing. Pour in enough antifreeze to where there is some in all of the spray tubing and some left over in the tank (usually 1–2 gallons in total but more may be necessary). Cap the nozzles and keep the antifreeze in the sprayer so it will be protected from cold-weather freeze events and internal corrosion. Cleaning the outside of the sprayer thoroughly is also important to remove any residue that could cause corrosion during storage periods.
While the steps outlined here are the most important to protect your sprayer during the winter, winter is also a good time to catch up on some other minor maintenance tasks such as cleaning nozzles. Place the nozzles and nozzle strainers in a basin with warm water and a detergent, then gently scrub with a soft-bristled brush to remove any dirt or grime. Rinse, dry and then store the nozzles in a safe place where they won’t get mixed up or thrown away. It is a good idea to label the storage place with dates of nozzle purchase to make it easier to keep track of how long they have been in use. Winter is also a good time to take care of sprayer detailing, such as touching up the paint. This will make the sprayer look better and protect it from rust and corrosion.
Additional resources
This guide is only a general overview of the maintenance activities to perform on a sprayer. The sprayer manufacturer, your local Extension agent, the sprayer dealer or an agricultural mechanic should be consulted for more in-depth information. There is a wide range of articles concerning sprayer maintenance, operation and optimization available at Sprayers101.com.
References
- Deveau, J. 2020. Airblast 101. Ontario Ministry of Agriculture, Food and Rural Affairs.
- Hoheisel, G. 2020. Six Steps to Calibrate and Optimize Airblast Sprayers. Washington State University Extension.
- VanGessel, M. 1997. Sprayer Clean-Out Guidelines: Reducing Crop Injury Due to Herbicide Contamination. University of Delaware Extension.
About the authors