Introduction
Modern farm operations increasingly rely on technology to reduce workload and maximize farm profit. Farmers depend on GPS-guided tractors to manage their fields, soil-moisture sensors to manage irrigation, and computer-controlled sprayer systems for pesticide applications.
Unmanned aerial systems are another example of technology deployed for agricultural production. Unmanned aerial systems are often called drones or unmanned aerial vehicles. However, a drone and an unmanned aerial vehicle refer only to the aircraft, whereas unmanned aerial systems include the aircraft, aircraft controller, flight control software and the payload the aircraft carries.
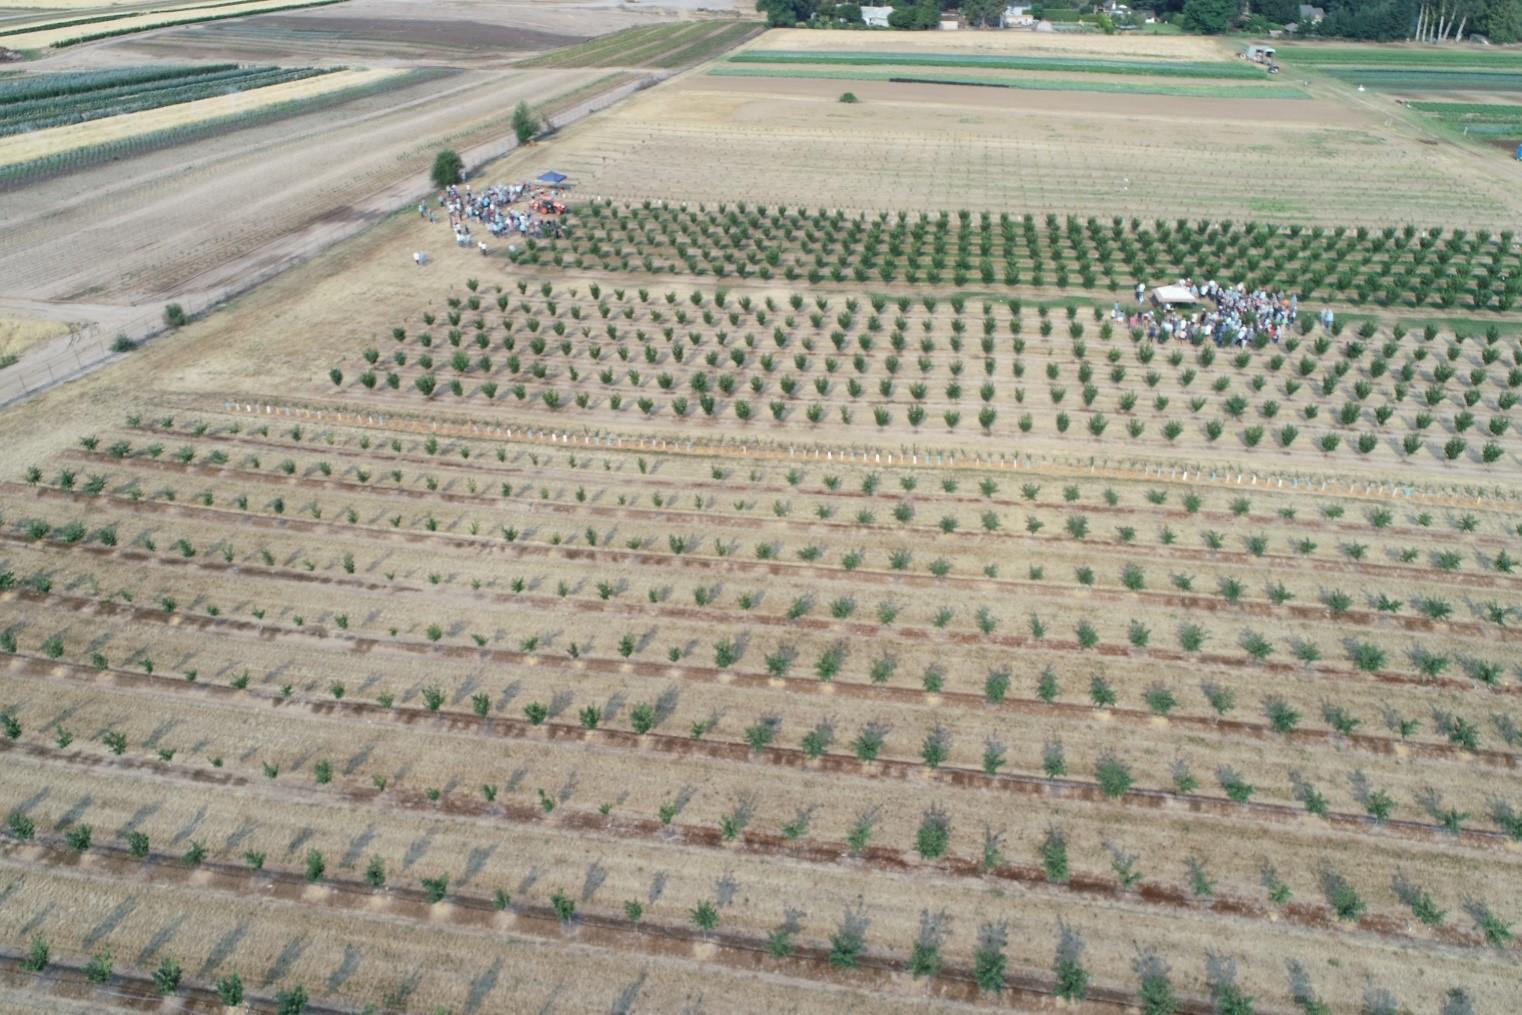
Unmanned aerial systems have been used by Oregon farmers to assess a cover crop planted just before the rainy season, cattle ranchers to scout their herd and avoid a long day on horseback, a nursery grower developing an inventory tool to count trees and agronomists scouting high-value overwintering crops for disease and nutrient status.
All of these examples of agricultural operations with an unmanned aerial system use aerial photography to save resources when accomplishing on-farm tasks. With the development of better, less-expensive equipment, many farms are considering unmanned aerial systems. However, the equipment can still cost between $700 to greater than $10,000, depending on features, requiring agriculture producers to carefully weigh the advantages before adopting this technology.
This publication outlines three steps towards starting your own on-farm unmanned aerial system program:
- Define the goal of an unmanned aerial system on your farm.
- Decide on unmanned aerial system equipment options.
- Comply with licensing requirements.
- Register your unmanned aerial system and fly
1. Define the goal of an unmanned aerial system on your farm
Where do I start? Set some goals!
First and foremost, determine what you would like to accomplish with your unmanned aerial system scouting program. Unmanned aerial systems are not a one-size-fits-all solution. Instead, when adopting this new technology, a key step is to identify the farming problems you have and how the technology will help address the problems to improve your farm operations. Some agricultural uses of unmanned aerial systems include field mapping, plant stress detection, pest and disease monitoring, weed management, locating herds, and counting livestock. You can also take footage of your farm to use in promotional materials. Each of these distinct uses requires different equipment investments, so it’s essential to identify the main purpose of your program before you start researching equipment options. Table 1 describes how a farm problem might be addressed by an unmanned aerial system. It also helps describe what equipment you will need.
Table 1. Examples of a farm challenge and applying an unmanned aerial system as a tool towards a solution.
|
Farm challenge |
Aerial survey program goal |
Aerial system requirements (described in section 2) |
|
Unknown growth of cover crop in a muddy field |
Fall/winter flights with camera imagery to determine canopy coverage |
RGB camera and software to stitch images for mapping plant growth |
|
Uneven crop growth in some field areas |
Periodic flights to evaluate plant health indicators |
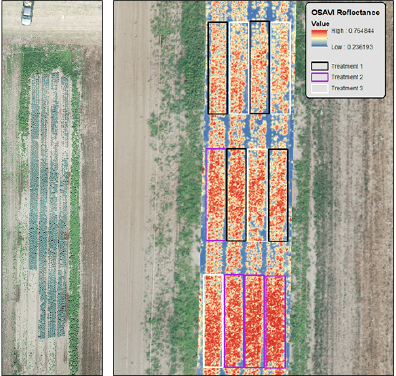
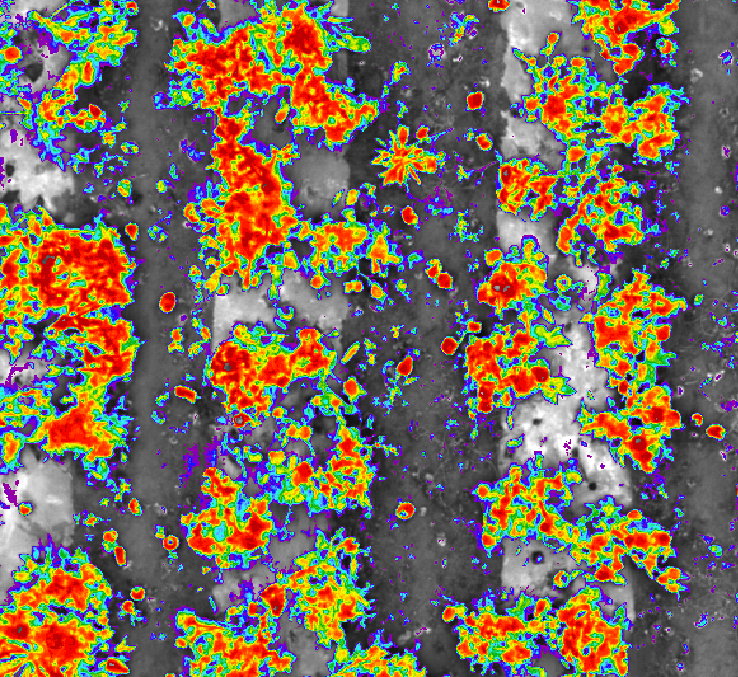
Multispectral or infrared (IR) camera for correlating images with field conditions, software for analyzing images. (Figure 2) |
|
Herd tracking at long distances |
Identify herd members with minimal travel time |
Easily portable, long battery life, live-streaming camera |
|
Low consumer engagement |
Improve customer knowledge of farm operations |
RGB camera that produces high-quality images and video, and ease of operation for media development |
Also, consider the weather during the times of year you will want to fly. Poor weather such as rain, fog or high wind will limit your ability to scout with an unmanned aerial system. For example, scouting for plant disease incidence in overwintering crops can provide useful information; however, the weather that promotes plant foliar disease (cool temperatures, lots of moisture) also makes it difficult to safely operate an unmanned aerial system (rain and foggy conditions). Setting a clear list of jobs and a time of year for operations will help identify the potential impact and opportunities of an unmanned aerial system program before purchasing equipment.
2. Decide on unmanned aerial systems equipment options
Selecting which unmanned aerial system to purchase has two major considerations: the platform and the camera (or other payload options not discussed here).
UAS Platform
Quadcopters are recommended as they can take off vertically, are easy to fly and hover, and are comparatively inexpensive. Fixed-wing, remote-controlled aircraft look more like miniature airplanes, require takeoff and landing strips, are more difficult to pilot than copters (especially in wind), but can have longer flight times than copters because of their ability to glide. Copters with more than four propellers, (e.g., eight-propeller octocopters) are better suited to carrying heavier loads. However, the power required for the additional rotors can reduce flight time, so they are not recommended for the uses discussed here.
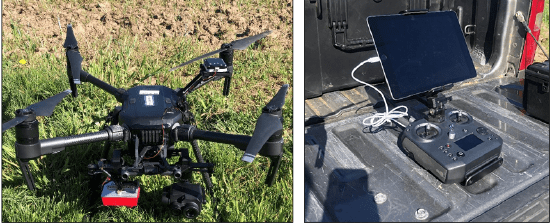
Just as the size and configuration of aircraft vary greatly, there are also many options for unmanned aerial system controllers. Many unmanned aerial systems allow for controlling the system with either a wireless device app (cellphone, tablet, etc.) or with a separate handheld controller (Figure 3, page 3). Controlling your unmanned aerial system with only an app is difficult due to the lack of physical controls, so purchasing a handheld controller is recommended.
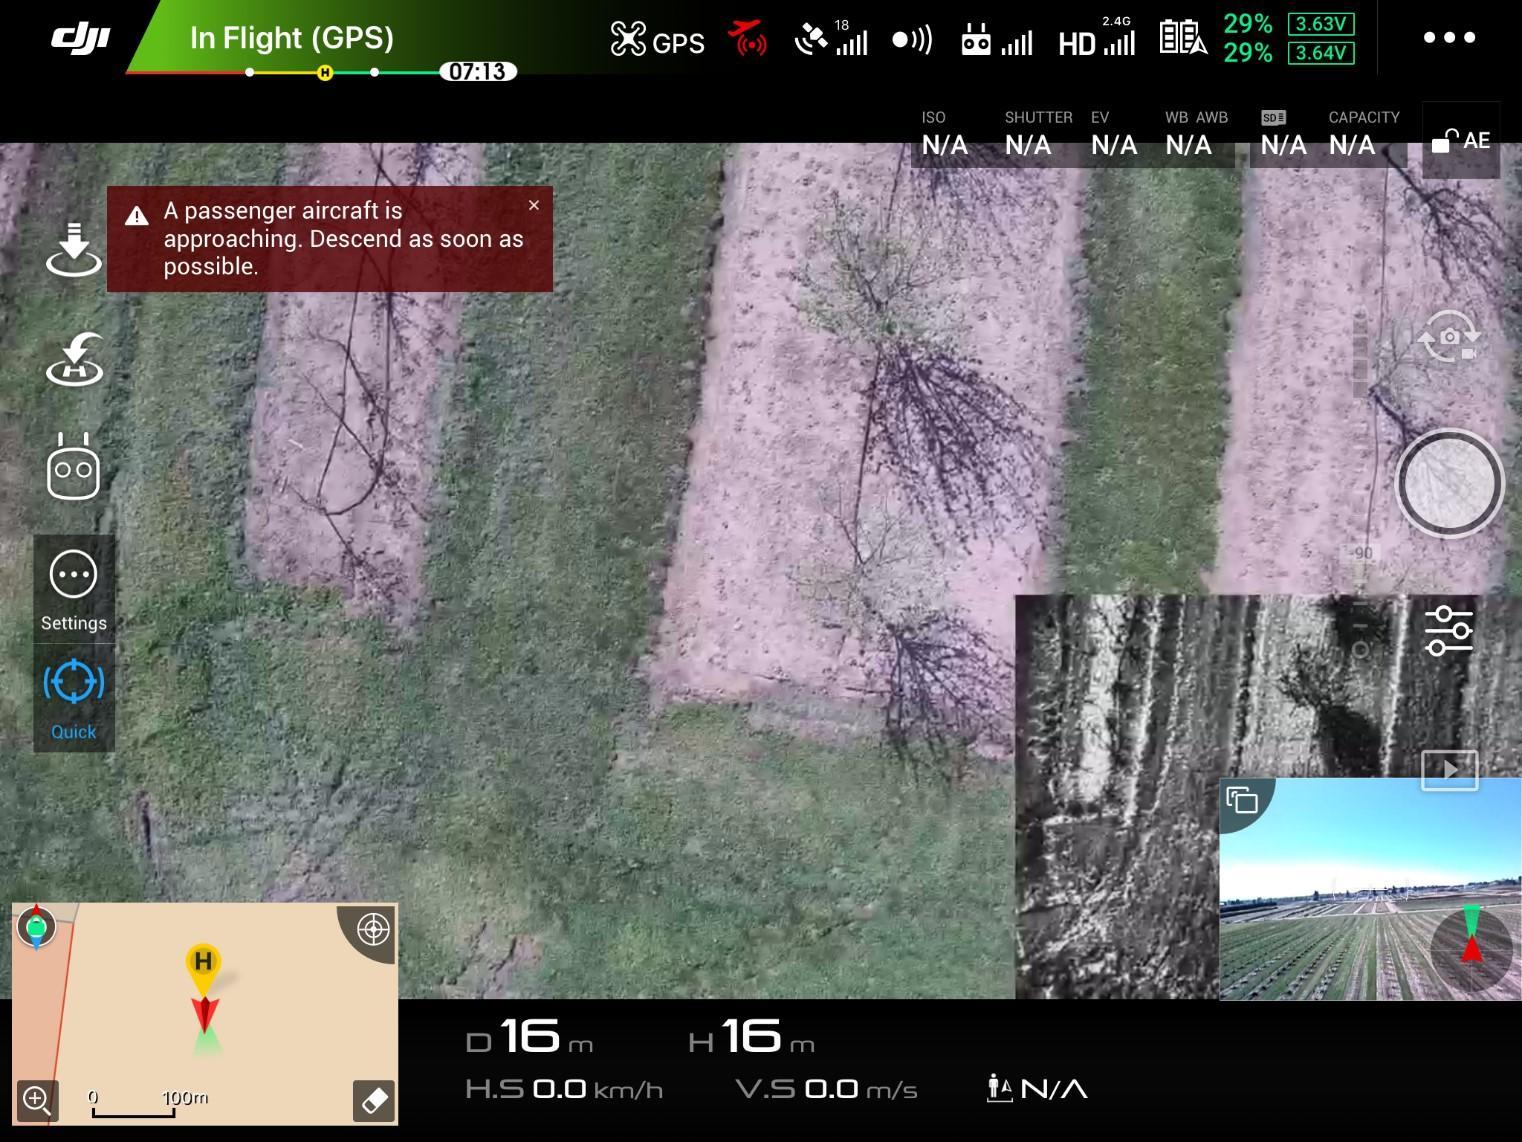
Many controllers connect to your cellphone or another device to allow you to view live images from the unmanned aerial vehicle and to run related software (Figure 4). Check the signal range for your unmanned aerial systems — some unmanned aerial vehicles may lose connection with the controller when only 200 feet away, which limits their usefulness. The ability to fly an automated flight path is also often a feature on unmanned aerial systems. This is necessary for applications where you will want to combine many images into a field map, and may help capture smooth video for promotional materials.
In addition to automated flight path options, many unmanned aerial system hardware packages now integrate hardware features with a host of programmed flight software for enhanced safety during flights. Automated obstacle avoidance is a helpful feature that relies on both platform hardware and flight software and can help your unmanned aerial system avoid trees and buildings in case of pilot error. Flight software frequently has a return to home feature that brings your drone back to its takeoff point (within about 10 feet, the limit of consumer-grade GPS). The unmanned aerial system may automatically return to home if it loses connection with the controller or the batteries are dying. While these safety features are useful, do not rely on them to prevent accidents; always keep your unmanned aerial system in sight while operating and use common sense when planning and operating your system.
Another important consideration for unmanned aerial system hardware is battery life. In our experience, we expect to get less flying time on a charge than reported by the manufacturer. The manufacturer likely tested in ideal conditions, whereas wind can cause your unmanned aerial system to use more energy to stay aloft and on course, and maneuvering the unmanned aerial system and carrying any additional payload also uses energy. Plan to have a margin of safety for the return flight, so that changes in wind or misleading battery life percentages don’t strand your unmanned aerial system in a muddy field or distant ridge. Spare battery sets or larger-capacity batteries may be a useful purchase.
Finally, consider how you will transport your UAS and keep components together. Does your system include a case? Does the case fit in your vehicle so it can stay protected from the weather? Often, a rancher needs to be able to carry equipment in something as small as a backpack worn while on horseback. This type of size constraint will likely be key to making equipment choices. You may want to order replacement parts and keep spares available to prevent downtime — propellers are often designed to break easily in collisions to reduce the damage they can cause in accidents.
Camera
For field scouting, you will likely want both a forward-facing camera to see where the aircraft is going (the unmanned aerial system may also use this for automated collision avoidance) and a downward-facing camera to photograph crops. In some cases, a gimbal, which enables the pilot to control the camera direction, will be a useful feature. A regular camera will capture visible light, and may also be called an RGB (red-green-blue) or natural-color camera, and is suitable for general scouting and field mapping.
Cameras and gimbals may come with your unmanned aerial system or be separate purchases, so be sure to understand what is included when shopping. If you want detailed images of plants for disease scouting, you may also want to check how the camera resolution will translate into the ability to see detail in images while flying at different heights, also known as ground sampling distance. Ground sampling distance is the distance on the ground covered by a single pixel from a specified height. It is directly proportional to your flying altitude. For example, if the ground sampling distance is 1 centimeter per pixel at 10 meters flying altitude, it would be 3 centimeters per pixel at 30-meter altitudes. The manufacturer of your camera will likely have a ground sampling distance calculator on their website.
Multispectral and hyperspectral cameras capture wavelengths outside of the visible spectrum, including wavelengths that can be useful in understanding plant health. These wavelengths are then used to calculate index values that provide information about chlorophyll content and other plant health measures. These cameras are expensive, and the images will need to be stitched together and analyzed using the software. This software may be included in the cost of the camera or cost up to $1,000 per year, depending on functionality.
Image analysis and software
The most time-consuming part of a drone scouting program may be image processing and data analysis. For example, we often use a multispectral camera for disease evaluations in the field. At each location within the field, the camera takes five images at different wavelengths.
When using a multispectral camera to scout for plant health, program the drone to fly a fixed pattern for appropriate sampling. A double grid pattern at a 75% overlap is recommended to get adequate coverage. For our multispectral camera, surveying 1 acre at 10-meter flight altitude gives a 0.69 centimeter ground sampling distance and collects 5.655 images across five bandwidths (nearly 14 gigabytes of data). Because of the large amounts of data involved and limited flight time, you may want to focus on areas of particular interest.
Once images are collected, the next step is combining the images into a whole field picture, called stitching. The software to complete stitching is available through many companies, as a one-time purchase or recurrent yearly or monthly subscriptions. The processing time for image stitching can vary between about 30 minutes and a few hours, depending on the number and resolution of images and your computer’s processing power.
Once the stitched image is ready, multiple data analysis options are available . Calculation of plant growth indices, such as Normalized Difference Vegetation Index (NDVI), is likely to be included in your software package. The data analysis process takes a set of traditional plant quality measures like leaf nitrogen content or visual ratings to establish a link between plant health conditions and growth index values (usually presented as a visual color scale as in Figure 2, page 3). After the relationship between the images and plant health is established, unmanned aerial systems scouting alone can be used. This process is called ‘ground-truthing’ for specific plant response and is the subject of much research.
Determining the resources needed
Depending on the goals of your program, unmanned aerial system equipment can be expensive, with packages for agricultural use starting around $8,000 for systems with specialized cameras. However, the largest expense for your scouting program is likely to be the personnel cost of operating and maintaining the unmanned aerial system. As the technology and regulations around these systems are still developing, also plan on time for software updates, flight planning and troubleshooting. It is worthwhile to consider how many people you would like to have involved in the program, their roles (certified pilots, maintenance, software, data analysis, etc.), and if their current workload can accommodate the extra time commitment. If you are scouting over very large areas or in rolling terrain, you may also need visual observers to maintain a visual line of sight to the aircraft during flight.
3. Comply with licensing requirements.
Determine your farm’s licensing requirements
If you use your unmanned aerial system to make a farm or livestock management decision, promote your farm, sell images taken by your aerial system or deduct it as a business expense, you are considered a commercial operator and will need a license to fly your system. If you lease land, let the owner know that you plan to start an aerial program. You will want to review your program to determine if it will fall under Part 107 rules.
Some important limits of Part 107 operations are:
- Aircraft must weigh less than 55 pounds.
- Aircraft may not operate over people not directly involved in the operation.
- Flights may only take place during daylight.
- Unmanned aerial systems may not be operated from a moving vehicle.
- Minimum weather visibility of 3 miles.
- Airspace restrictions around airports.
Waivers are available for these limits, but you will have to demonstrate the safety of your operation, the review process may be lengthy, and the requirements may be unclear.
Study resources
The Federal Aviation Administration provides study resources and online videos to help you prepare for your exam. Remote pilots must be at least 16 years old. If you do not have experience with the FAA airspace system, 24 hours of study is suggested as a guideline. Be sure to download and use the Airman Knowledge Testing Supplement for Sport Pilot, Recreational Pilot, Remote Pilot and Private Pilot (FAA-CT-8080-2H). While it contains material not relevant to your test, this is the book that test questions will refer to for figures and maps, so familiarity with it is an advantage.
As you study, check the areas you wish to fly in for airspace restrictions. Visualize it shows air space restrictions and aeronautical weather reports. 1800wxbrief shows temporary flight restrictions and the FAA provides a website to check Notices to Airmen. This is an opportunity to practice skills for the remote pilot exam and become familiar with common issues that may affect your flights.
When you are ready to take your test, create a profile with the FAA, and schedule your Unmanned Aircraft — General (UAG) exam with a Knowledge Testing Center. Once you have passed the remote pilot exam, you will be issued a Temporary Airman Certificate while you wait for your Remote Pilot Certificate. You will need to take a shorter exam to recertify every two years.
4. Register your unmanned aerial system and fly
Before you fly, ensure your unmanned aerial system is registered with the FAA and labeled with your registration number. Keep your drone registration and pilot information up to date so that you receive information on new rules and proposed rules.
You are finally ready to fly your UAS
A test flight in an area with few potential hazards is recommended, where you practice using any automated flight software you plan to use as well as free flight, takeoffs, and landings. Keeping a flight log is a good idea to help you track your flights and how weather affects unmanned aerial system performance and data collection activities. Templates and apps are available for this purpose. It is also recommended practice to log your battery use and recharging events. Follow manufacturer guidance on battery charging and storage, and log flight time and percentage of charge remaining after the flight so you can be sure to have functional batteries when you need them.
Remember, unmanned aerial systems software and regulations are changing rapidly. Be sure to plan time for software updates before flights and stay current with the newest rules through the FAA website.
About the authors