How to Make a Rope Halter
4-H 104 • Reprinted July 1999
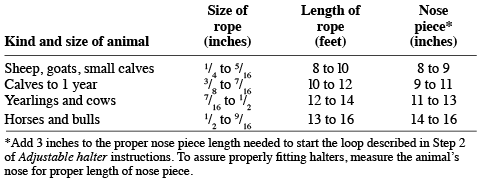
Rope halters are easy to make. They are inexpensive, adjustable, useful in leading and tying, and are quite durable if kept dry. In making your halters, use good quality, three-strand manila rope. Use the table as a guide for selecting the right size and amount of rope.
Suggestions for leaders
- Make at least one halter yourself and be sure that you understand all of the steps before teaching your members.
- Show your members a completed halter and tell them its advantages. Let them decide if they want to make halters.
- Determine the size of the halters, and the size and amount of rope needed.
- Discuss whether or not the club wants to go to the store to buy rope.
- Have all members make their halters at the same time. Make one with them as an example.
- Take each step in turn. Tell and show members how to do each step. Stand so members can see and follow your hand movements.
- Let all members complete each step before starting the next.
- Plan for members to halter animals after completing the rope halter.
- Discuss the care of rope halters.
- Allow a junior leader or older club member to assist or instruct rope halter demonstrations.
- Remember, 4‑H develops boys and girls. What they learn is more important than what they make.
Haltering an animal
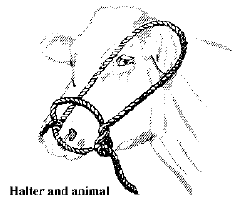
To put a halter on an animal, adjust the size of the head stall, allowing slack in the chin strap. Take the lead and loop splice in your left hand, holding the nose piece and chin strap open, and the head stall in your right hand. Approach the animal from its left side, slip nose piece over the nose with the chin strap underneath; place head stall over the top of the head and back of the ears. Adjust head stall if necessary.
Securing the ends
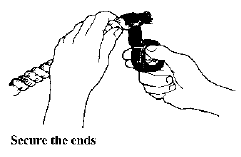
Never let rope strands unravel. If they do, the rope is harder to work with and is not as strong. To secure the ends, first make a clean, square cut by placing the rope on a firm block and cutting with a sharp knife or axe. Secure the ends by either wrapping the rope (two or three turns) with friction tape about 1/2 inch from the end or whipping the ends with strong string.
Care of the halter
Keep the halter dry and clean. Always hang it up when not in use.
Adjustable halter
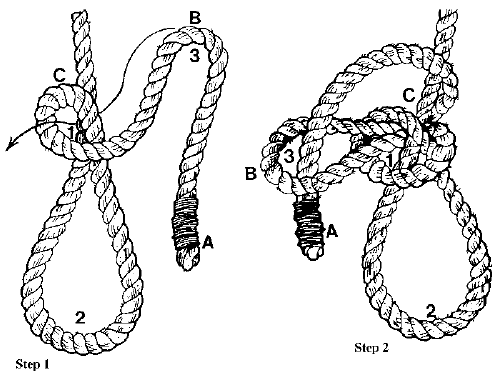
Step 1. To make an adjustable halter for cattle, measure and cut off about 12 to 16 feet of rope. Lay it out in the manner shown below. At the end of the nose piece (A), attach rubber electrical tape to prevent raveling. Then measure from end (A) a length of rope about 14 to 16 inches long; make the loop for the lead rope to go through. For illustration purposes, (A) will be the short end or nose piece.
Step 2. Open the rope at (C) and put the short end (A) through (B) at (C).
Step 3. Open rope (A) at (D) and put long end (B) through (A).
Step 4. Put (A) through (B) again at (E) and draw up tight.
Step 5. Take the end of (A), next to the tape, and twist it until three rope loops appear. Twist the three loops around until they are parallel to each other.
Step 6. Pull lead rope (B) through the three loops; take the long end of lead rope (B) and put it through the larger loop on the other side. The halter is now ready to use except for the end of the lead rope. Tape or splice the end of the lead rope.
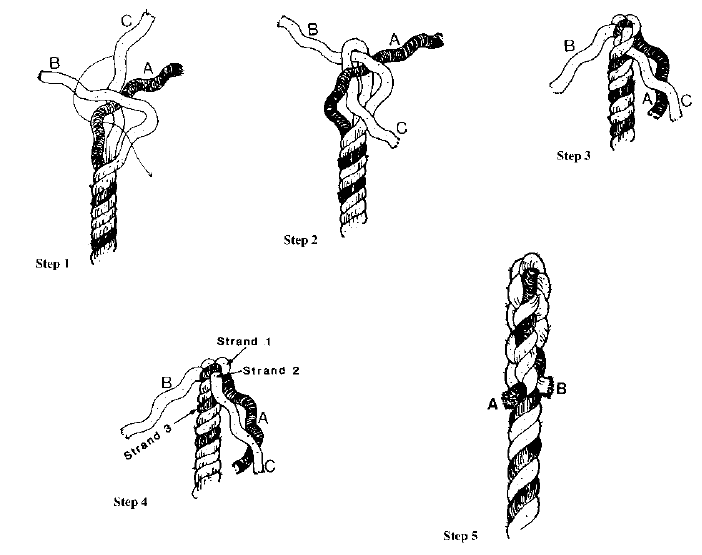
Spliced crown
The spliced crown prevents the end of the rope from raveling and provides a good hold for leading.
The spliced crown prevents the end of the rope from raveling and provides a good hold for leading.
Step 2. Bring end (C) down in front of (B), under (A), and through the opening.
Step 3. Form the crown by pulling all the strands up tight. A solid three‑cornered knot, with the ends pointing down the rope, results.
Step 4. Weave the ends back into the rope. Start with any end such as (C), put it over strand 1 and under strand 2, keeping it at a right angle to strands 1 and 2.Draw strand (C) down tight and give the rope one‑third turn to the left. Give the rope another one‑third turn to the left, and put end (B) over strand 3 and under strand 1. Pull the ends down firmly and weave all the ends in at least once more.
Step 5. Cut the strands about 1/4 inch from the rope, making the completed crown as shown. After completing the braided areas, roll them with your shoe to smooth out the edges.
Manager (quiet release) knot
The manager (quick‑release) knot is best for tying cattle anywhere. It is similar in construction to the slip knot, but is much easier to untie.
Step 1. Throw a loop at (1) in front of rope (C). Bring the bight at (B) around back of (C) and through the loop at (1).
Step 2. Finish by putting end (A) through bight (B) and draw up tight.
This information is provided for educational purposes only. If you need legal [or tax] advice, please consult a qualified legal [or tax] adviser.Trade-name products and services are mentioned as illustrations only. This does not mean that the Oregon State University Extension Service either endorses these products and services or intends to discriminate against products and services not mentioned.
© 2017 Oregon State University.
Extension work is a cooperative program of Oregon State University, the U.S. Department of Agriculture, and Oregon counties. Oregon State University Extension Service offers educational programs, activities, and materials without discrimination on the basis of race, color, national origin, religion, sex, gender identity (including gender expression), sexual orientation, disability, age, marital status, familial/parental status, income derived from a public assistance program, political beliefs, genetic information, veteran’s status, reprisal or retaliation for prior civil rights activity. (Not all prohibited bases apply to all programs.) Oregon State University Extension Service is an AA/EOE/Veterans/Disabled.